Windows 10 Night Vision Mode
Easily Add Night Vision Mode To All Your Astronomy Software When Using Windows 10
John D. UptonMarch 27, 2018 (Updated June 10, 2022)

Windows 10 has added features that are quite helpful for use in the field at night while enjoying astronomy. This article describes how to customize Windows 10 so that all of your astronomy software applications can be used in deep red "Night Vision Mode". No special hardware or software is required. Just customize Windows 10 settings and enjoy benefits similar to using Rubylith or other dark red filter over your screen -- all without the filter.
While many do not like using Windows, it has nearly become a requirement in astronomy, and astrophotography in particular. Windows 10 now has display settings options that should be of interest to astrophotographers. I purchased a new laptop for imaging back in December 2017 that had Windows 10 installed. It was my first introduction to Windows 10. As it is for many, it was unfamiliar territory coming from Windows 7 and Windows 8. Digging beneath the multitude of re-scrambled and misplaced (?) user interface settings proved to be worthwhile. I discovered features that were actually a big step up from my use of previous versions of Windows.
I used to use overlay films of different types to make my screen red while imaging. While some / many astronomy software programs implement a Night Vision Mode, some don't and sometimes we use software tools while imaging that don't have such a mode (or don't support the system settings pushed out by other programs that do). Hence arises the need to use Rubylith, Red Acetate, and other physical screens to cut back on any non-red lighting coming from the laptop.
While poking around in Windows 10, I found that you can configure it do a much better job than any external screens I have seen to date. I found that several of the display settings features could be combined to make the laptop much more useful and friendly for astrophotography. After playing around for several days, I stumbled upon a combination of settings every bit as good as using Rubylith over the screen. The final effect using only native Windows 10 settings is as good as any astronomy program's Night Vision Mode. I now no longer use any external device or software program for implementing Night Vision Mode. I can switch to a Windows mode which puts ALL software into Night Vision Mode. Below is a screenshot of my laptop screen using this mode.
I was amazed at how good this looked when I started playing with it. It was actually more effective and dimmer than the Rubylith I used to use on my previous imaging laptop. It also doesn't interfere with the view of the screen. I always had some trouble reading small fonts through the Rubylith as they became blurred slightly.
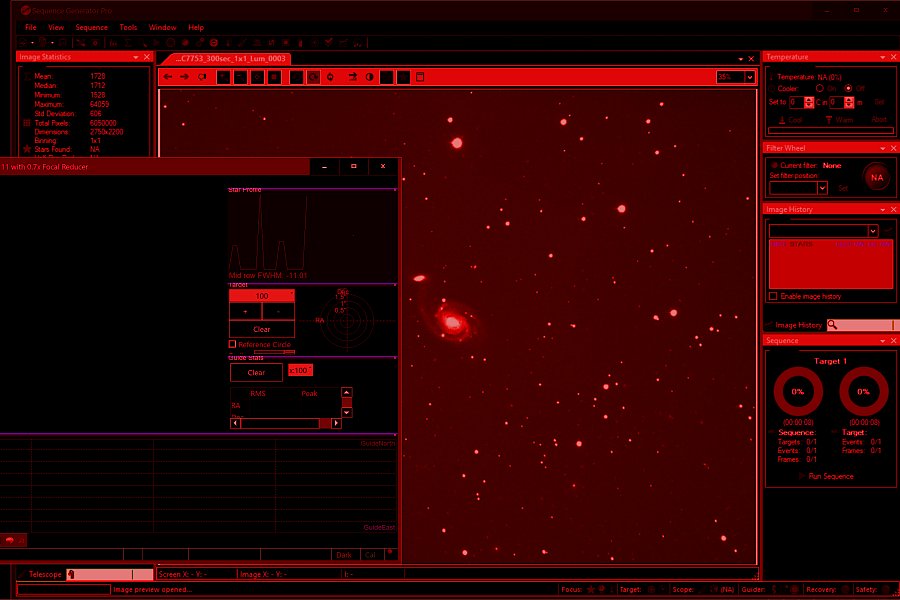
The photo is cropped to show the only a portion of the screen. I am running Sequence Generator Pro, and PHD2 Guiding in this shot. None of the software is in Night Vision Mode. Only pre-configured Windows 10 settings are used for this deep red night vision effect.
To set up this mode, I created a Windows Theme which used a plain black background. I then added a custom High Contrast Theme to Windows and set the custom desktop theme to use that. Next I configured the Windows 10 Night Light mode to use the lowest color temperature available. Finally, I turned on the Night Light mode in the Windows 10 Notification / Control sidebar. To put finishing touches on the configuration for ease of use, I created two shortcuts -- one sets the custom Night Vision Mode for imaging and the other restores my default custom theme for normal laptop use. In use, I click on the Imaging Theme shortcut at the beginning of the imaging session, turn on the Night Light mode and image away. At the end of the night, I click on the Normal Theme shortcut, turn off Night Light mode and I am back to using a typical daytime laptop.
I will note that this works best on laptops that use an IPS screen. Non-IPS screens tend to scatter white light sideways and may in some cases still need a physical barrier for spewed back-lighting that escapes towards the sides of the display. Such is not the case when this technique is used on an IPS screen.
The key advantage here for me is that any software you use while set up for imaging is in the stealth Night Vision Mode already. You don't need to turn on any such mode in any of the applications you are running. (In fact, I think it's better to leave them all in their normal operating mode when using this technique.) It is fun and a little unusual to see and use things like PixInsight in Night Vision Mode. I sometimes have it open to check star profiles and get noise estimates and such while imaging. Using Windows 10 to implement the Night Vision Mode makes that (and more) possible.
The following is a tutorial style article that should allow you to set this up on your own Windows 10 laptop.
Preparing Windows 10 Night Light Settings
The first thing we will do is to personalize the Windows 10 Night Light setup. This will be used along with the theme settings we will create to make the Night Vision Mode as deep red as possible.
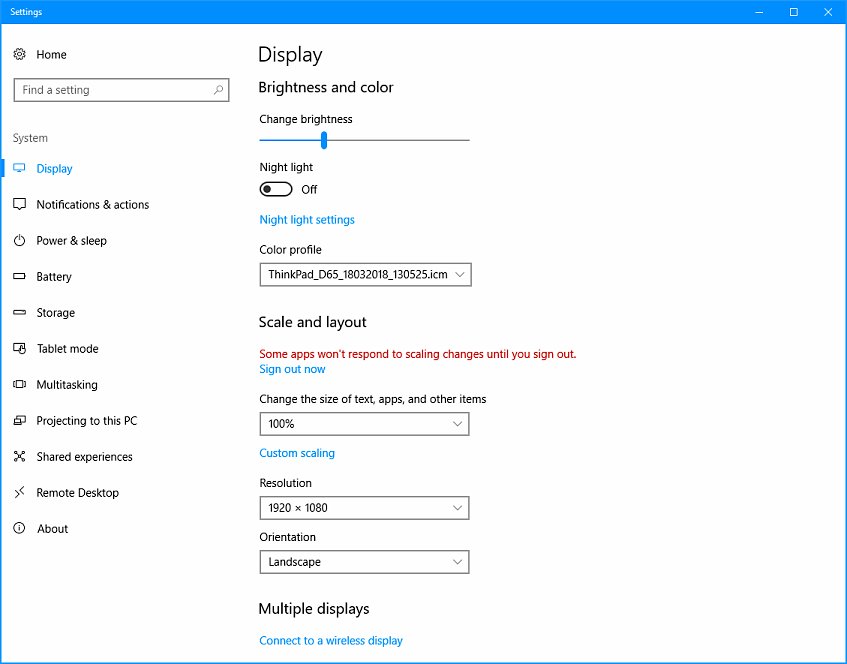
- Step 1) Right click on the Windows 10 Desktop and select "Display Settings" from the context menu.
- Step 2) On the Settings | Display page, select "Night Light Settings" as seen in Figure 2. You do not need to turn the Night Light switch to On. In fact, it will be easier to complete all of the changes you will be making if the Night Light is turned Off.
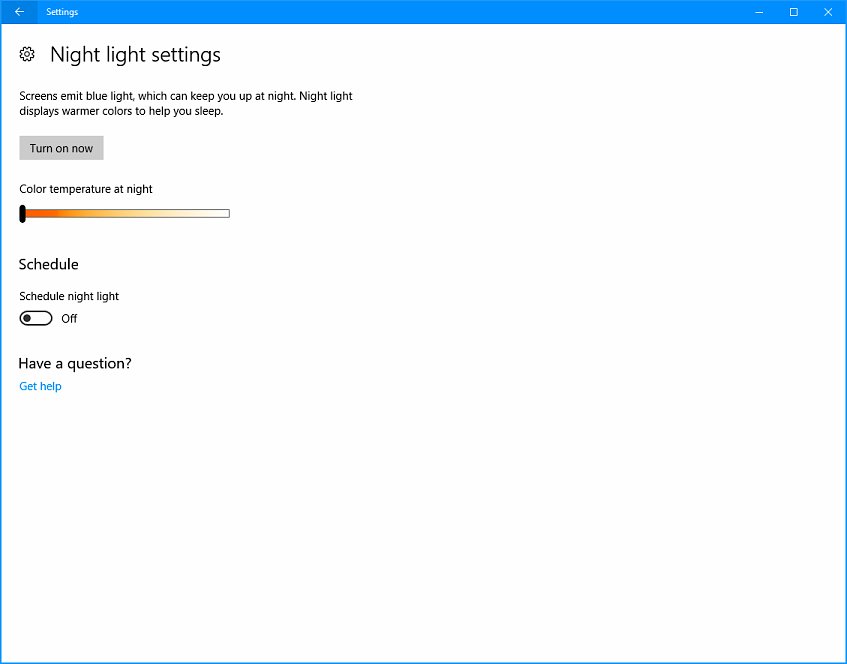
- Step 3) On the Settings | Night Light Settings page seen in Figure 3, grab the Color Temperature At Night slider and pull it all the way to the left. This sets the Night Light to a very red color.
- Step 4) Close the Display Settings window. This portion of setting up a Night Vision Mode is complete.
Creating The Windows 10 Night Vision Theme
Next we will create the high contrast theme which is used for our Night Vision Mode. This will involve setting up a plain dark background, modifying the Windows 10 window frame colors, and configuring a new palette of high contrast colors for our windows.

- Step 5) Right click on your Windows Desktop and select "Personalize". The Settings window will open.
- Step 5) Click on the Themes menu on the left side of the Settings window and the current theme settings will show as in Figure 4.
- Step 6) If you have already done some personalizations to your existing Windows Theme, you should ensure that it has been saved now. To determine whether any unsaved changes are already in effect, look at the button beneath the Current Theme name. If it says Save Theme, then these settings have not yet been saved. Click the Save Theme button and give it a name you will recognize like "My_Default_Daytime_Theme".
Now might be a good time to save a default personalized Windows Theme if you are still using one the Windows defaults. Make some change to your existing theme such as changing the Desktop Background image or window frame color scheme and then click the Save Theme button. Having saved a custom theme makes it much easier to restore your overall Windows Theme when you exit from the Night Vision Mode we will create.
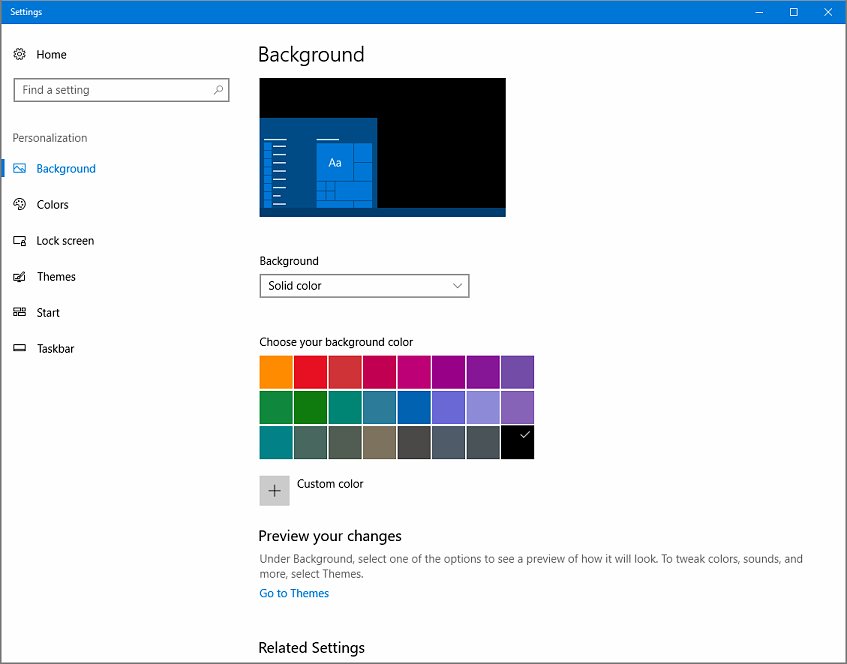
- Step 7) The next step is to change the Background selection from Picture to Solid Color and select Black as your chosen color. Click on the "Background" icon link to make these changes. The Settings | Background page will be shown as seen in Figure 5. Use the first drop-down selection box to select "Solid Color" for the background and then click on the black color in the color swatches shown.
- Step 8) Next we will change the Window Frame Color palette. Click on "Colors" in the left side menu of the Settings window. Choose the color red from the color selection tiles.
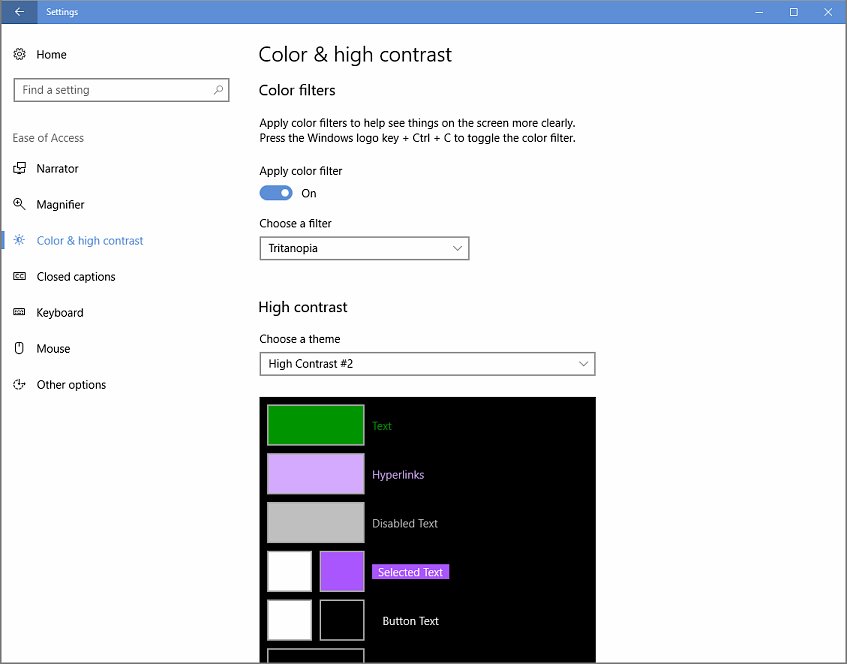
- Step 9) Now, scroll down to near the bottom of the Colors Settings page and select "High Contrast Settings". You should see the Settings | Color & High Contrast page as shown in Figure 6.
- Step 10) On the Color & High Contrast page, the first thing to change is the Color Filter settings. First turn on the Color Filter switch and then select "Tritanopia" from the drop-down selection box. This setting seems to slightly enhance the color saturation of our high contrast palette. Note that Windows treats this as a "sticky setting" that is still applied after you exit the custom Night Vision Mode. You will either need to manually turn the Color Filter switch to off after using Night Vision Mode or skip this step entirely. Night Vision Mode will still work fine if you skip this step. The color are only slightly changed.
- Step 11) We will now be making a lot of changes in the high contrast settings to create our custom high contrast palette. To begin, select "High Contrast Black" from the "Choose a Theme" drop down box just below
the High Contrast label. (Note that the screen shot in Figures 6 through 9 show an incorrect selection.)To make each change to a specific color element of the palette, you will need to click on the each color box in turn and
type in the desired new color value. After entering the new color, press the Done button.
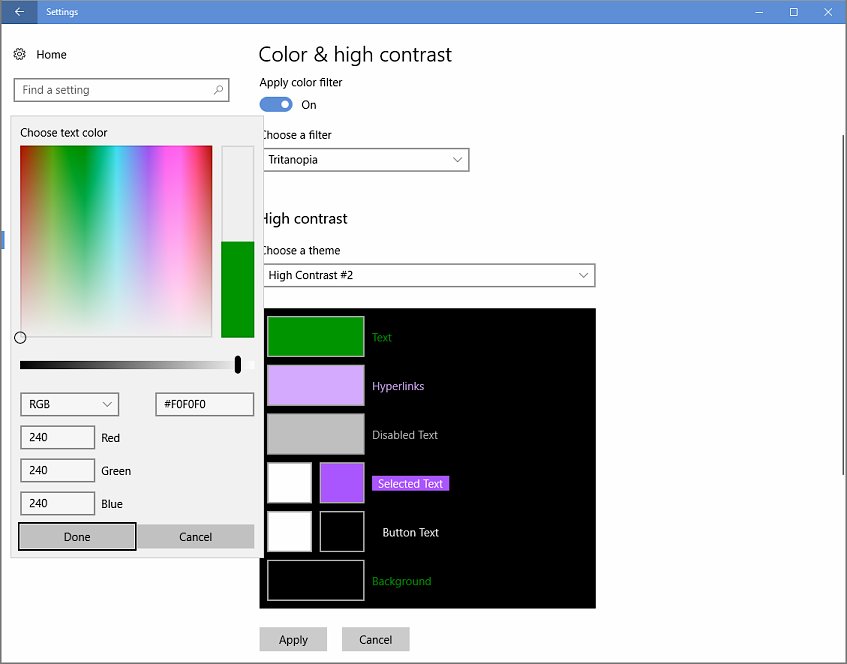
- Step 11a) We first modify the color of the "Text" to be displayed in Night Vision Mode. Click on the Color Box to the left of the Text label and enter "#F0F0F0" in the color entry box that pops up. Click the "Done" button after changing the color value.
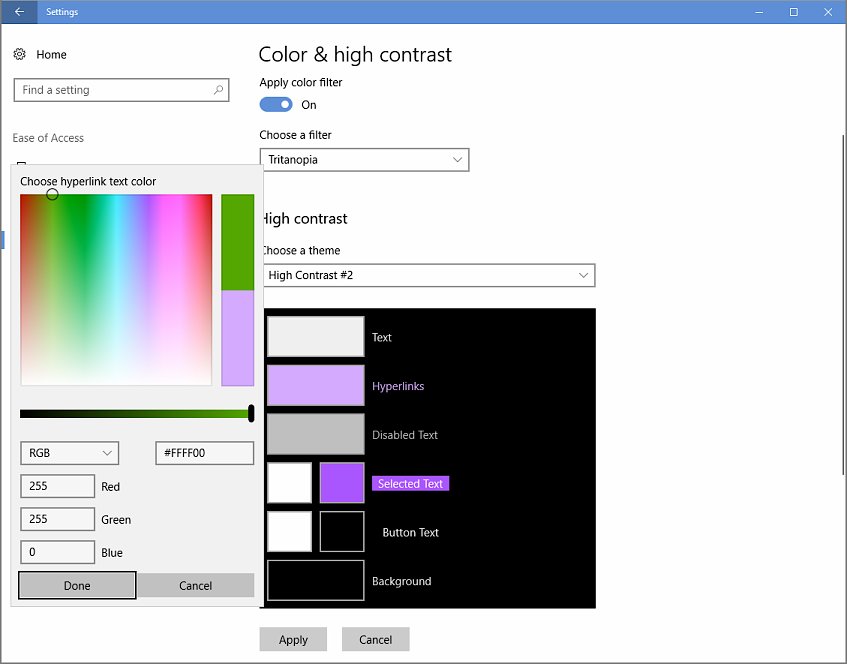
- Step 11b) Secondly, we change the color for displayed Hyperlinks by choosing the color box for Hyperlinks and entering "#FFFF00" for the color value. Again, Click the Done button after the entry.
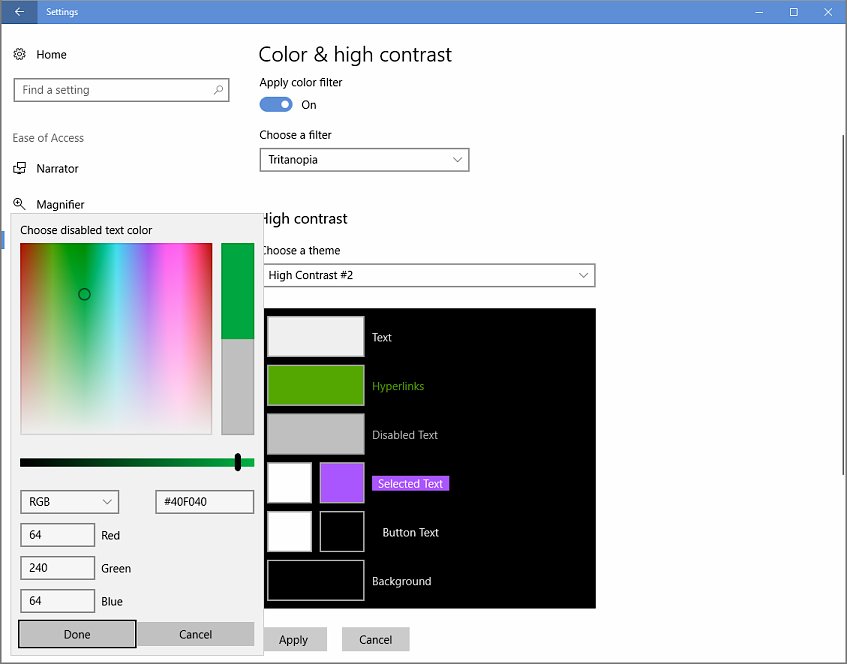
- Step 11c) Next change the color of the Disabled Text in the same way. Here, we will use a color value of "#40F040". Click the Done button after entry.
- Step 11d There are two color boxes for the next two entries. In the first one (Selected Test) click the left color box and enter a color value of "#000000". After clicking "Done", click the right color box and enter a value of "#C02000" and again click done after entry is complete.
- Step 11e) In the next pair of color swatches (labeled Button Test), click the left color box and enter a color value of "#FFFFFF". After clicking "Done", click the right color box and enter a value of "#000000" and again click Done after entry is complete.
- Step 11f) Finally, in the last color selection governing the Background areas, click the color selection box and enter a color value of "#000000". (The background should already be set to that value but verify it to be sure.)
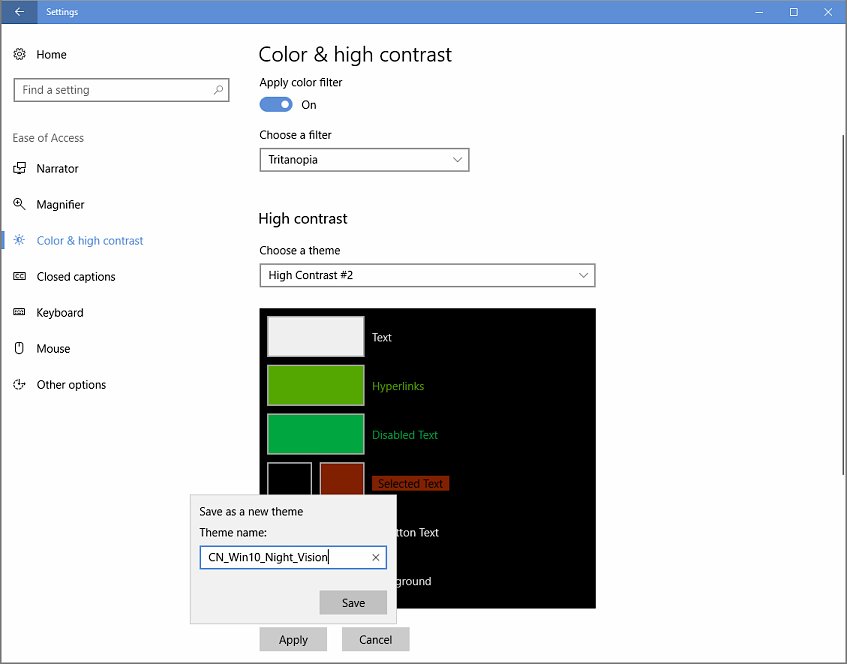
- Step 12) Now we will Apply and save these customized High Contrast Color settings. Click the Apply button and a pop-up window will ask for a name for this special high contrast theme we have created. Use a name that you will remember as your Windows 10 Night Vision Mode. I will use "CN_Win10_Night_Vision" as the name in this example.
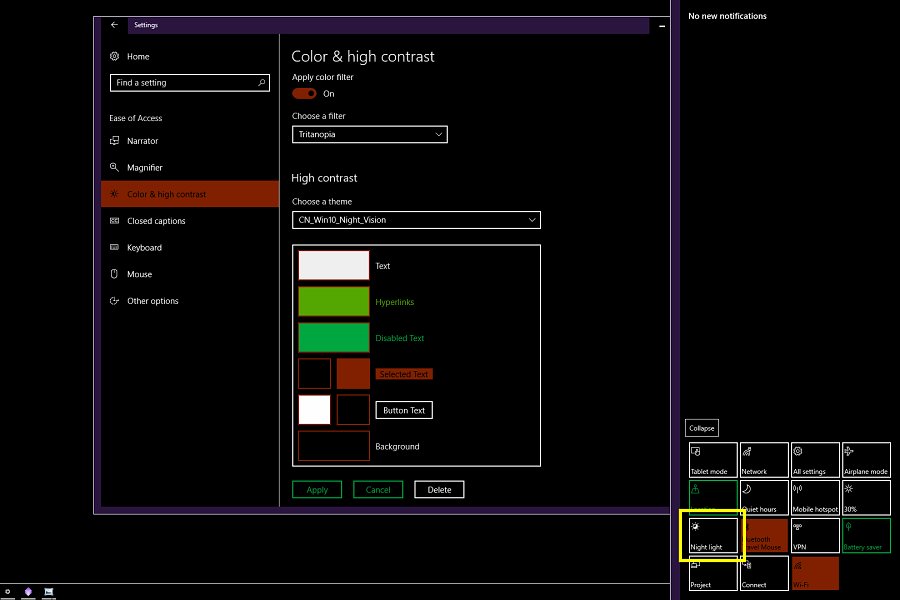
The creation of the Windows 10 Night Vision theme is now complete. You should be left with a Settings window that appears very similar to Figure 11 below. If you would like to see what the new theme looks like, move your cursor to the bottom right of the task bar and bring up the Windows 10 Notification and Control side panel. In the tools shown in the panel, click on Night Light to turn it on. (I show the control here with a yellow box around it for visibility.
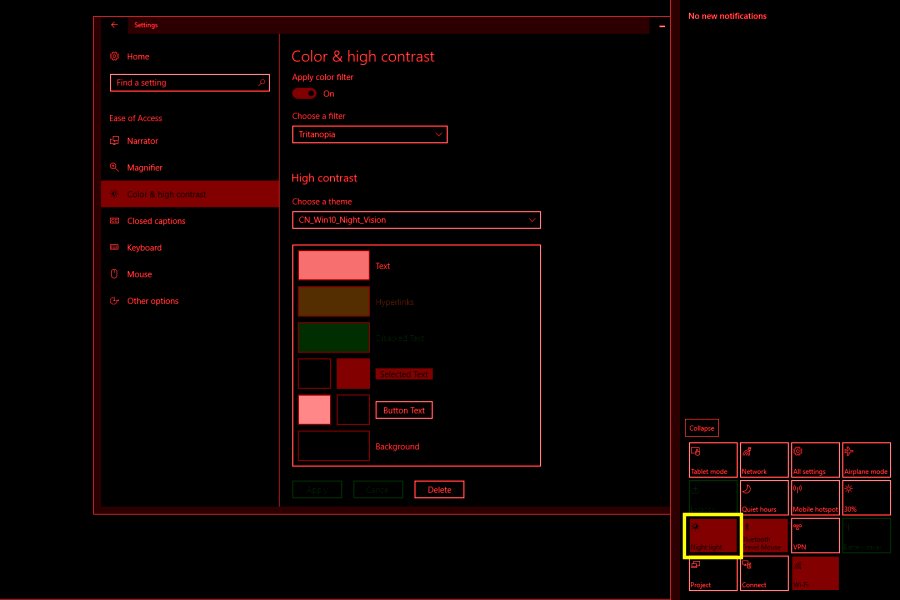
Once the Night Light is turned on, the whole display should go into Night Vision Mode. All windows should appear very red with no overly bright elements. To turn off the Night Light, and return everything to the high contrast mode we created, click on the Night Light button in the Notification area again.
Creating Theme Shortcuts For Ease Of Use
Now that we have a functioning high contrast palette to use for our Night Vision Mode, we need to create a couple of shortcuts to make it easy to get into and out of the mode. The CN_Win10_Night_Vision theme we created is stored in the AppData directory under your default user area. In addition, any normal theme you have created before should also be stored there. The theme files have an extension of ".theme". Let's now create some shortcuts to our normal and Night Vision themes. (Note that the AppData folder we will be visiting is a normally hidden folder. You may need to go into the Tools area of the windows file manager and turn on the option to show hidden files.)
- Navigate to the C:\Windows\Users\your_user_name\AppData\Local\Microsoft\Windows\Themes folder.
- Find the saved customized theme you want for your normal usage. (It was named My_Default_Daytime_Theme in my example above.)
- Right click and select Copy from the context menu.
- Navigate to where you want the shortcut and right click selecting Paste Shortcut. I placed the two created shortcuts into a folder on my desktop where I keep shortcuts to other applications I use while imaging. It keeps all my tools in one place.
(Note that some areas or folders may not allow you to paste a shortcut. In those cases, you will get a message saying "you cannot create a shortcut here". I created a new folder elsewhere on my system and put the shortcuts in it. I then added that folder to my Start Menu under a custom "Imaging Tools" section which also links to all my software that I use while imaging.) Repeat the Copy and Paste Shortcut steps for the saved theme you will use for imaging.
- Navigate to the C:\Windows\Users\your_user_name\AppData\Local\Microsoft\Windows\Themes folder.
- Find the saved customized theme you want for your Night Vision usage. (It was named CN_Win10_Night_Vision in my example above.)
- Right click and select Copy from the context menu.
- Navigate back to where you want the shortcut and right click selecting Paste Shortcut.
Once the two shortcuts are created, you are ready for image. At the start of a session, first double click on the shortcut for your Night Vision Mode. Next, go to the Windows Notification area and turn on the Night Light. All applications running on the computer should now look like they are in Night Vision mode. At the end of the imaging session reverse the process. Turn off the Night Light in the Notification area and then double click on the normal default daytime theme shortcut. You are back to normal.
If you need to temporarily look at anything on the screen in normal colors, you can simply turn off the Night Light for a few seconds and then turn it back on. This becomes the equivalent of lifting up the Rubylith screen for a quick peek at the laptop.
The color settings described above are likely not completely optimal. I settled on these after a few days of experimentation. Feel free to experiment on your own with changing the colors in the High Contrast Theme settings. Be sure to turn on the Night Light as you play with new colors as they will look very different and what appears to be a good color may become invisible in Night Light mode.
Night Vision Finishing Touches
There is one more change that some users may wish to implement. After completing the steps above, the Windows Title Bar and borders will appear cyan color in High Contrast mode and change to dark green once the Night Light is enabled. If you wish to change the Windows Title Bars to red, just follow the steps below. This is entirely optional but some users may prefer the red Title Bars to the default dark green color.
- Navigate to the C:\Windows\Users\your_user_name\AppData\Local\Microsoft\Windows\Themes folder.
- Find the saved customized theme you want for your Night Vision usage. (It was named CN_Win10_Night_Vision in my example above.)
- Copy your Night Vision Mode theme as a backup and give it a name you can later use if required.
- Edit the theme file using Windows Notepad.
Right click the file and select "open with..." then find and select notepad.exe (or your favorite editor) from the choices. - Find the [Control Panel/Colors] section in the file
- Change the ActiveTitle= line to read ActiveTitle=128 0 0
- Change the InactiveTitle= line to read InactiveTitle=0 0 92
- Save and close the theme file.
- Test it by double clicking on it.
The Title Bars and borders of the active windows on the screen should now show up as red when using the Windows Night Vision Mode theme.
Night Vision + Custom Power Modes
One other piece of the overall imaging puzzle is that I also created three new Power Plans for use on the laptop. I now have an "Imaging Setup" plan, an "Image Capture" plan, and an "Image Processing" plan. They are each customized for their respective use.
The image Capture plan reduces power consumption and screen brightness as low as possible. It also allows me to close the lid and keep on imaging. The Image Setup plan uses slightly higher screen brightness but allows sleep mode when the lid is closed. Image Processing mode sets the brightness for normal room usage and mostly pulls out all the stops for highest CPU performance.
Between the Night Vision Mode and my Image Capture power plan, the (otherwise very powerful) laptop draws only about 5 to 7 watts and doesn't need any light shields or red screen overlays for star party usage with other imagers around.
Conclusion
Windows 10 has added some useful tools that can aid the astrophotographer. Experiment a bit. I think I have only scratched the surface in terms of adapting my laptop for low power, low light usage.
If any errors or omissions are noted, please feel free to email me by clicking on my name at the bottom of the page.