14" Mirror Making Log
A Progress Log For Making a 14" F/4.5 Telescope Mirror
John D. UptonJune 28, 2002 - May 1, 2003
This is a log of one of my ATM mirror making projects. It will allow others to see the long winding road complete with wrong turns, detours, and small successes that all glass pushers encounter. First time mirror makers may be able to learn from my many mistakes.
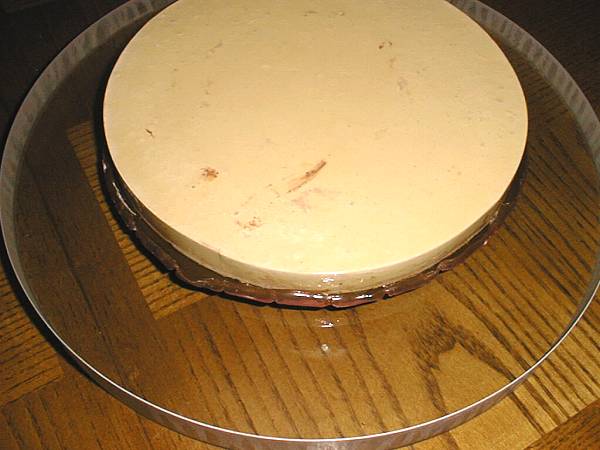
This article is simply a log of my experiences in making a 14" F/4.5 mirror. This mirror was ground from a 1.25" thick Pyrex blank I have had for some time. I was ready for a shorter term project that I could accomplish in a reasonable amount of time. [Or so I thought... The project proved to be more challenging than I expected because of the short focal ratio of this mirror.] I was required to take vacation time over the Fourth of July holiday week (2002) while it was raining (and flooding) here in central Texas. This seemed like a good way to sit out the weather and have fun at the same time. (Pushing glass can be a lot of fun or a lot of frustration if you let it. You just have to adjust your outlook depending which mood you are in at the moment.)
The blank I used was already generated to an F/4.5 focal ratio. The back was also ground and had a texture of about #220 grit. My initial measurements of the sagitta showed that it was probably about 1" short of being exactly F/4.5, but not enough so to try hard at changing it. Since this mirror will be used in a visual instrument on an alt-azimuth mount, I had no particular reason to shoot for some exact focal length. I decided to start grinding at #220 grit and give it enough time to thoroughly grind away any generation marks and subsurface damage.
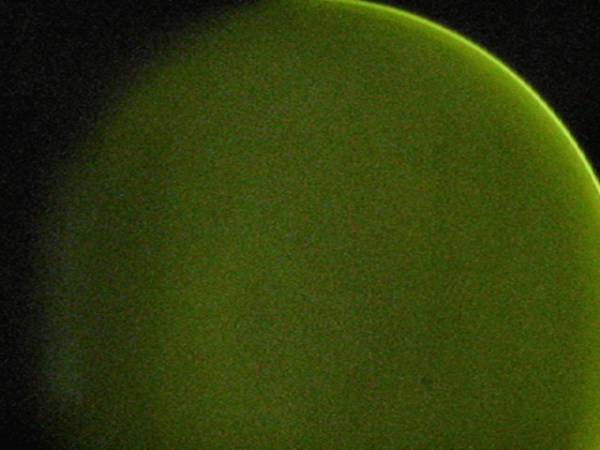
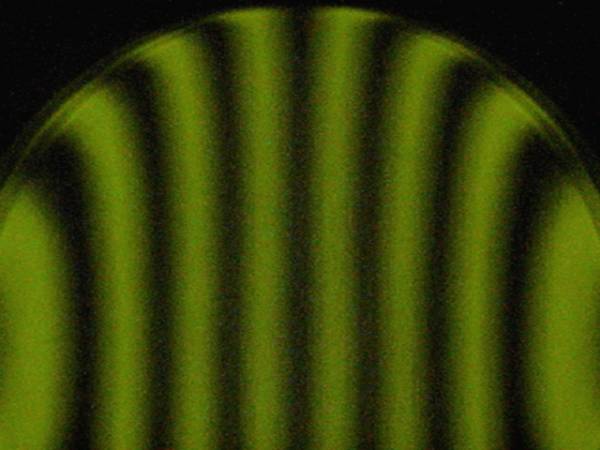
Here is the chronicle of my trials and tribulations with this mirror. I tried to keep this updated as I went along. I also tried to take as many photos as possible to show progress. It is easy enough to take photographs of the mirror with my tester, so each polishing or figuring session is accompanied by a photo showing results. The tester has a Web camera attached at the viewing port. I rarely use a visual test method any more. The Ronchi Test images are all taken outside the center of curvature at an offset chosen so that about seven bands are visible. All Ronchi photographs used a 133 line per inch grating. Each of the images on this page (like nearly all on this site) are accompanied by a larger (600 x 450) version that may be accessed by clicking on the thumbnail.
Friday, June 28, 2002
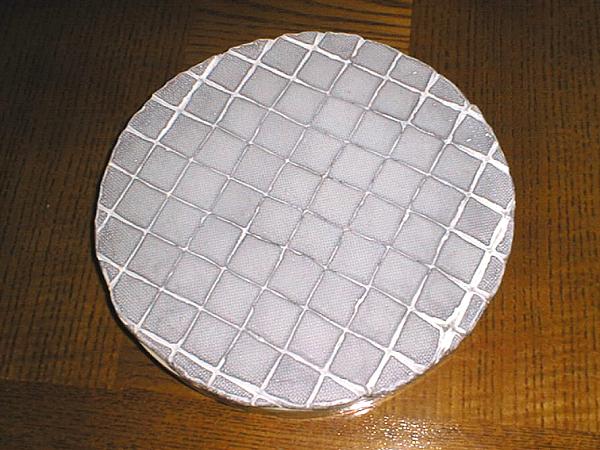
I built the form for the plaster tool base and made preparations for pouring the tool. The diameter of the base was made to be 9.5 inches.
The tiles for the tool were cut out of the larger mat, nibbled to approximately fit a circle, and smoothed with a diamond wheel on the drill press. I also ground a preliminary bevel on the circumference of the tile circle using a diamond hone.
Saturday, June 29, 2002
The plaster tool was poured in the same way as my other tools. I wrapped the tool in paper towels, sealed it in a plastic bag, and stored it under a couple of pillows to allow it to cure. After about six hours, the tool was unwrapped and allowed to begin to dry out.
The tiles were epoxied to a piece of fiberglass window screen.
Monday, July 1, 2002
The tool was placed on a shoe rack in the electric clothes dryer on low heat for two hours. I painted the back and sides of the plaster tool with epoxy. After the epoxy had cured for 6 hours, the front of the tool was also covered with epoxy.
Tuesday, July 2, 2002
The tool base and tiles were placed on the shoe rack in the clothes dryer to warm them up while the wax was melting. A small dam of tape was placed on the tiles. For the most part, this was more trouble than it was worth. I will skip this step next time to see how messy the wax becomes without the dam. The mirror was covered with foil and the tiles placed face down on it. Wax was spooned onto the back of the tiles and and allowed to penetrate the window screen. Some wax was also painted onto the tool base.
Hot wax was then poured onto the tiles and the sealed plaster base placed on top. After cooling, some voids were found around the edge of the tool where the molten wax was not pushed out far enough. These voids were touched up by painting hot wax into them and around the edge of the tool.
I started grinding with #220 grit. Thirty wets of #220 were done today. Each group of ten wets took about an hour to complete. After this long session, the tool was found to be in complete contact on all tiles.
Thursday, July 4, 2002
I did 20 wets of #220 to finish up. (There were a total of 50 wets of #220 done. This should be more than enough to clean up any subsurface damage.) There are still many wide, shallow pits on the mirror. I estimate there are two to three pits per square inch remaining. These seem to be size of #80 pits and I'm not sure they can be removed without going back to #120 grit. I have decided to push forward and hope they will grind out in the following stages.
After cleaning up the tool and work area, 15 wets of #320 grit were done. The pit situation seems to be improving.
Friday, July 5, 2002
I found two small areas on the grinding tool where the epoxy coating had been ground away by the grit at the bottom of the wash bucket. Water has caused a slight peeling of the coating in those areas. I repaired the areas of peeling epoxy coating by scraping it back to good plaster and adding fresh epoxy. I let this cure about 6 hours before starting more grinding.
I completed #320 with 5 more wets. (This makes 20 total wets done with #320.) The tool seemed to want to "grab" on the mirror at times. This can be caused by poor contact or by friction toward the end of an extended wet. Since it often happened near the end, I attributed it to drying of the grit slurry. I cleaned out the tool channels and made the remaining wets a little thinner. That seems to have fixed the problem. I cleaned up everything and remelted the wax on the tool's channel surfaces before starting into the next grit size.
I did 3 wets of #500. The mirror surface looks uniform already, though the wide shallow pits are still evident. I have not been marking their location, so I cannot be sure they are the same pits.
Saturday, July 6, 2002
I did 12 wets of #500 to finish out that grit size. (There were 15 wets total of #500.) The slurry kept drying out after just a few minutes, so I added some more soap to the spray water bottle. (The temperature in my garage has been reaching 90°F to 95°F the past few days.) The soapier water and clean channels helped some. I extended the last wet by adding only water until it was quite thin and watery. I touched up the bevel on the mirror after the last wet and then cleaned up the work area. I didn't want to chance getting glass chips on any of the work area. The tool underwent the normal cleaning and remelting of wax between grits.
I ground 2 wets with 14.5 micron grit. Close inspection showed that nearly all the pits I had been seeing were gone. The surface looks pretty uniform, so I will assume that things are okay to finish up the fine grinding.
Sunday, July 7, 2002
Before proceeding with the final two grits, I decided to grind the back of the mirror just in case it is not really flat. The generated surface was difficult to check with a straight edge, so I felt the grinding would ensure a flat surface. I also wanted to at least flash polish the back prior to finishing the mirror. Now seemed as good a time as any. I used the 12.5" tool I used for the back of my 17.5" mirror. I started with #320 grit. As it turned out, this was a good move. The back was not completely flat and showed a "potato chip" shape after grinding with one wet of #320. There were two wide strips about 2" wide at the sides that did not get ground during the first couple of wets. It took a total of 9 wets to get the full back surface evenly ground. I checked curvature and adjusted the strokes to keep the surface as flat as I could.
For the mirror's back, I followed the #320 with 5 wets each of #500, 14.5 micron, and 9.5 micron. I then put pads on the tool and polished for 1 hour using cerium oxide. The surface was nearly clear to the unaided eye. A haze can still be seen in a bright light and there are a great number of scratches, but the surface is "clear" and flat to within 0.0001" (convex) over the 8" span of my spherometer. I now feel better about finishing up the fine grinding and starting to polish the mirror's face.
Monday, July 8, 2002
I resumed grinding the mirror's face. I completed the 14.5 micron abrasive by doing 8 wets. (This was a total of 10 wets of 14.5 micron grit.) I next cleaned up and did 10 wets of 9.5 micron grit. At this stage, with a thin abrasive mixture, I could feel the mirror and tool trying to grab occasionally. I went back to using thicker slurry of abrasive. I decided not to tempt fate and grind with the 5 micron powder I have. The chance of scratching is too great and by polishing on pads, I should be able to make up the time lost.
Tuesday, July 9, 2002


After cleaning up, I applied the polishing pads to the tool. I used a total of six of the 2.5" by 3" pads. One was centered on the tool and four were spaced around the periphery at 90° intervals. The remaining pad was cut into four pieces and spaced around the periphery of the tool in the gaps between the full pads. I added three thin (1/4") plywood cleats to the polishing stand to hold the mirror in place. I glued these in place using "hot melt" glue as is my standard practice for this barrel. These cleats were not required during grinding. The non-slip rubber mat I use under the mirror was all that was needed to hold the mirror in the grinding stages.
Two 30 minute polishing sessions were done. I used a rather thick slurry of CeO applied directly to the pads for the first session. I used a thinner CeO mixture for the second 30 minute polishing session. At this point the pads seem to be well charged with polishing agent and the mirror's surface is nearly clear to the unaided eye. Only a slight haze is now present on the mirror's face. The haze appears to be rather uniform from center to edge of the mirror. The polishing forces are very high. I broke two of the cleats which hold the mirror on the barrel and had to re-glue them.
I started another polishing session but had to stop because I lost two of my polishing pads. Upon closer inspection, I found that all were loosening. This has not been a problem before. I removed the remaining pads and thoroughly washed and dried the tool. I used a hair dryer on low heat to gently warm the tool and ensure there was no hint of moisture on the surface. I applied five new pads in the same pattern I used before. I did not bother cutting up an extra pad to help fill in the gaps on the tool. After applying the pads, I carefully burnished them down and then left the tool to cool back to room temperature. After cooling, I once again burnished each pad into good contact with the tile surface.
Thursday, July 11, 2002
I began polishing again using the pads. Only a single session of about 40 minutes length was done this evening. The mirror's surface is very nearly clear to the unaided eye with only a hint of haze visible in strong light. It does not yet pass the laser test for degree of polish. The test does reveal that the edge is not polishing as quickly as the center.
Friday, July 12, 2002
Three polishing sessions of about 30 minutes each were done. The mirror's surface is beginning to look very nice. The whole surface just passes the laser test, but the outer 3/4" or so shows slightly more scattered light than it should. Just to be safe, I will give the pads one more hour and then switch to pitch lap polishing.
Saturday, July 13, 2002

Two 30 minute polishing sessions were done. The drag on the tool is extreme. I had to repair broken cleats on the stand twice during the hour of polishing. After the session, another laser test was performed in a nearly dark room. The mirror now passes the test all the way to the edge. In total darkness, only a very subtle hint of the surface can be seen. This is as good as the lens on my Canon camera.
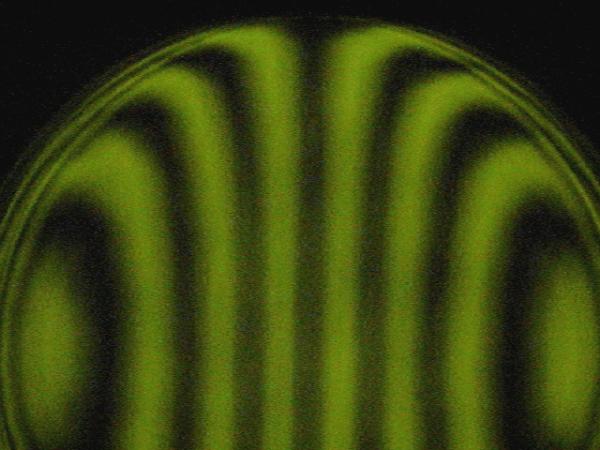
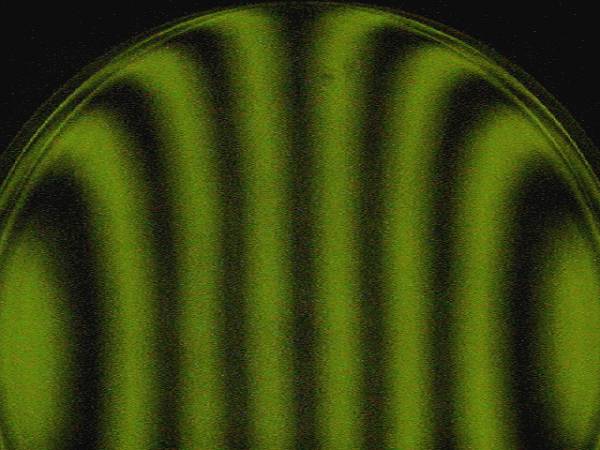
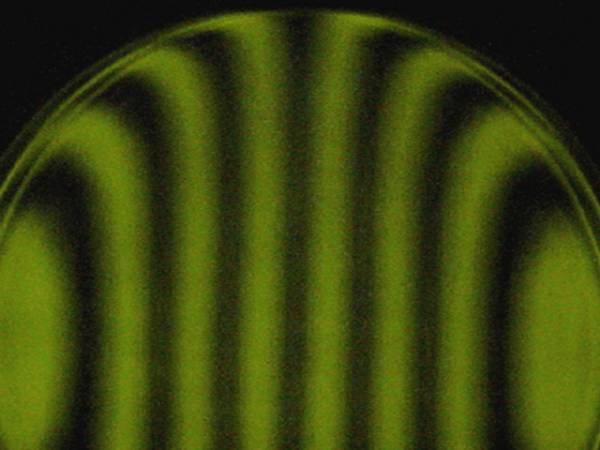
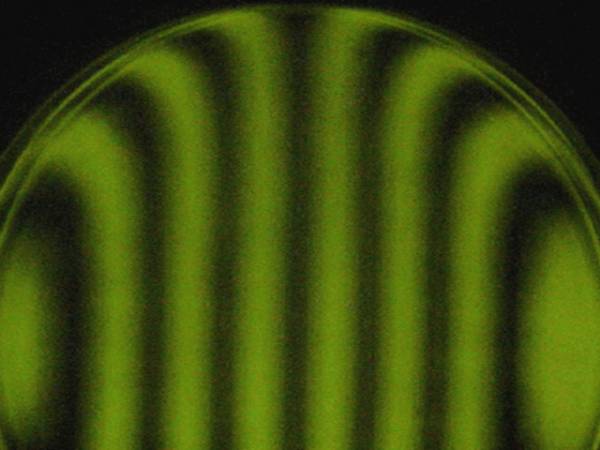
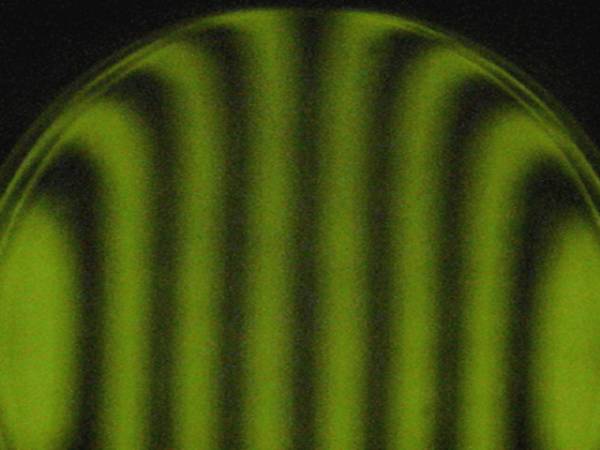
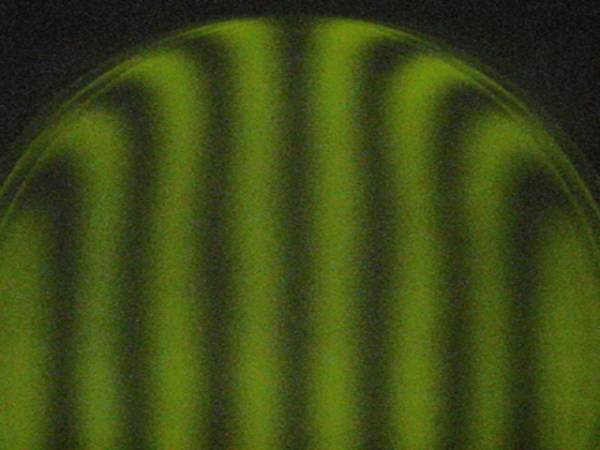
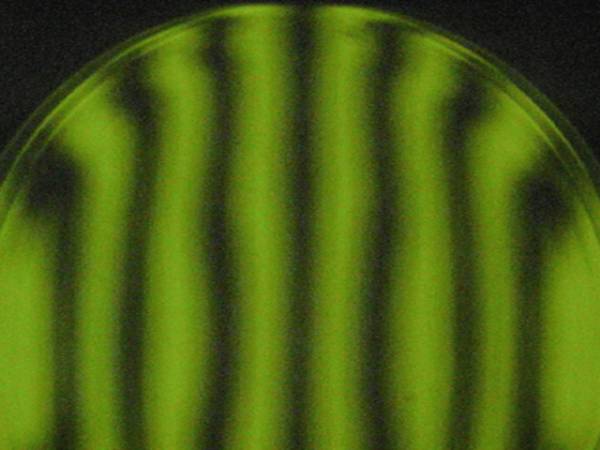
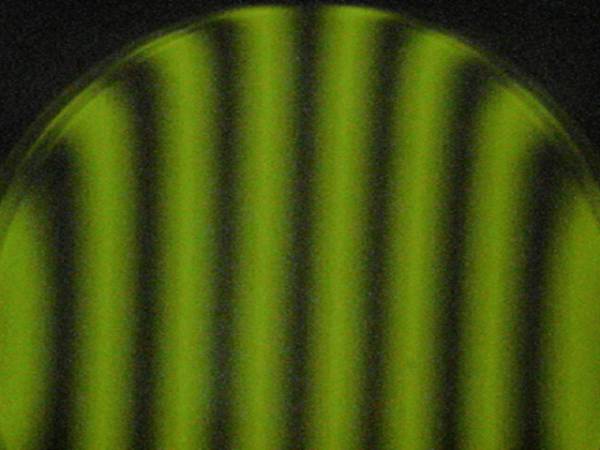
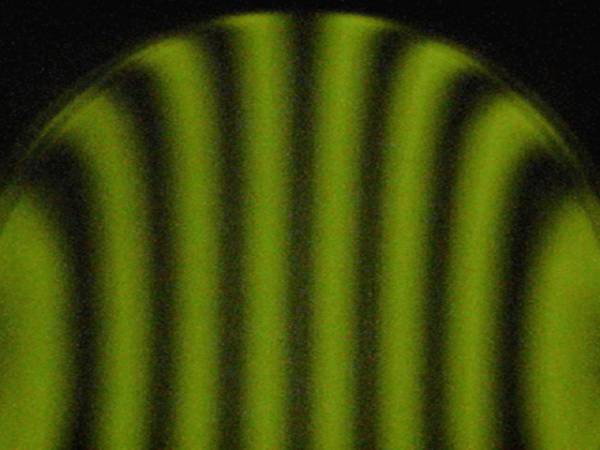
I made my first optical (Ronchi) test of the surface. It showed a much smoother surface than I expected to find. I had thought I would find a very rough surface with lots of zoning. While the surface is not as smooth as a lap-polished mirror, it was pretty good and little zoning was seen. The outer 3/4" to 1" shows as badly turned under the Ronchi test as seen in Figure 3. I don't find this too surprising since I had trouble getting the outermost 1/2" to fully polish out. That area was lagging behind the rest of the mirror during polishing. My strokes during the initial polishing on pads were evidently not long enough. The results of the laser test and this first Ronchi image have convinced me to move on to making the pitch lap and starting to smooth and correct the mirror.
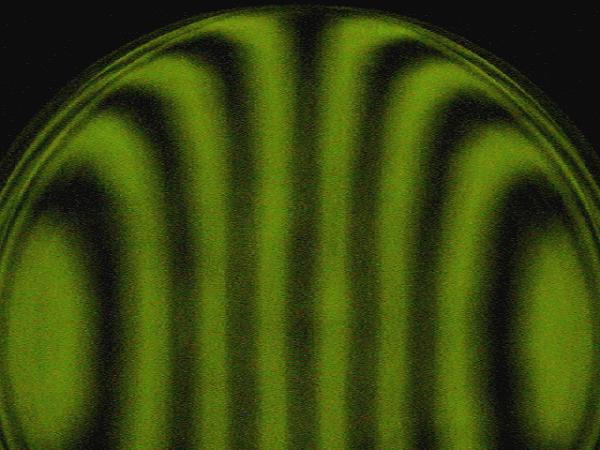
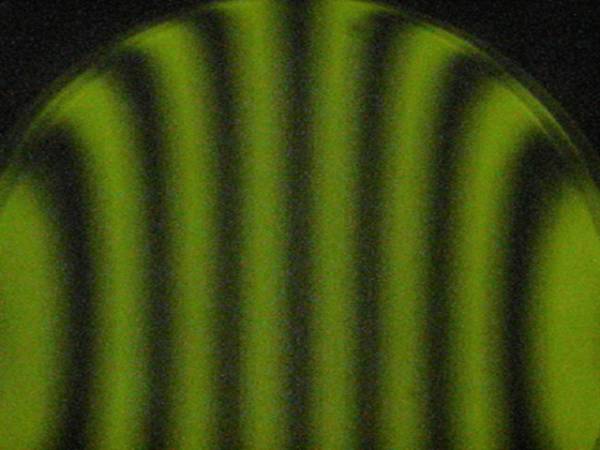
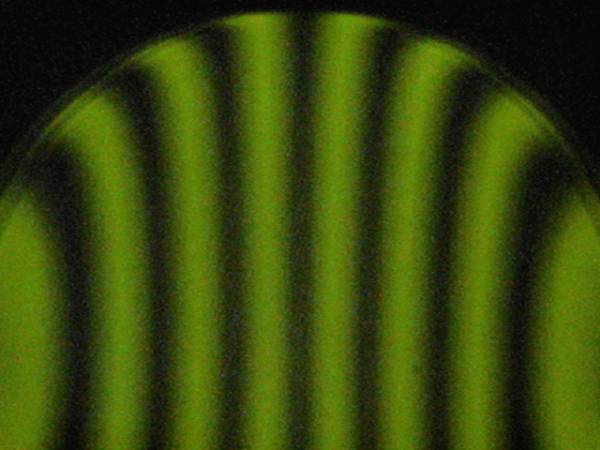
Diffraction effects in the Ronchi test on this mirror are much worse than on other mirrors I have tested. I did some processing of the Ronchigram to help me determine the true extent of the turned edge and separate its appearance from the diffraction effects. The processed image appears in Figure 3b. I enhanced the contrast of the image a little to help me find the highest order side images of the mirror. I used a paint program to draw a circle at these positions the same diameter as the mirror. These are the white circles in Figure 3b. Next, I drew in a rough circle (in red) that seemed to mark what appeared to be the extent of the turned edge in comparison to the bends in the Ronchi bands. I was then able to measure the relative diameter of the "good" inner circle to the mirror's full diameter. This gave me a good idea of how much turned edge I am dealing with.
Sunday, July 14, 2002
I made the mold for the 9.5" plaster base for the pitch lap. I poured the plaster base and wrapped it in wet paper towels. Then I sealed it in a plastic bag and let it cure overnight.
Monday, July 15, 2002
Took the plaster base cast out of the plastic bag and left it to dry at room temperature all day. Monday evening, I baked it for about an hour in the clothes dryer on medium heat. I then applied a thin coating of epoxy to the flat bottom and sides. This was left to cure for a day.
Tuesday, July 16, 2002
I coated the top convex side of the plaster tool with epoxy. I also touched up some areas on the side of the cast that were too thin or not covered well with epoxy. This was left to cure overnight.
Thursday, July 18, 2002
I prepared the pitch for the lap. I mixed 30 year old Edmund Scientific pitch with more recent Willman-Bell pitch. The newer pitch was much too soft while the old pitch was very hard and dry. By mixing the two, I was able to get a blend that seems about right. It is slightly softer than I usually use, but should work okay.
Friday, July 19, 2002
I prepared the pitch lap. I started by painting the plaster base with a thin coating of wax. I did this to ensure that the pitch would not react with or soften the epoxy coating. Mel Bartels had reported that in his experience, pitch sometimes softened the epoxy. The mirror was covered with one layer of wet paper towels and aluminum foil. A thin (1/4") dam was built on the covered mirror. The inside of the dam was completely painted with a thick CeO release mixture.
The pitch was melted and then allowed to start to cool and thicken. I stirred it constantly as it cooled. When it reached a point that it was thick but could still be poured, I poured it into the dam. The plaster base was then inverted and pushed into the pitch. I only waited a few minutes before sliding the lap off the mirror. I was concerned about overly heating the central part of the mirror. As it turned out, the heat did not penetrate the foil and paper towel covering much. The pitch was still a little too soft, so there were some rough areas and ridges on the lap caused by sliding it off the mirror. I cooled the lap rapidly by putting it under cool, running tap water.
Saturday, July 20, 2002
I channelled the lap in my normal way. After channelling and cleaning the lap, I warmed it slightly with the heat gun and covered it liberally with CeO mixture. It was then pressed on the mirror. I pressed with about 8 pounds of weight for about an hour. I removed the weight and allowed it to press overnight with just the weight of the tool.
My normal procedure for a polishing or figuring session to to cold press the pitch lap for 15 to 30 minutes before starting. Usually, the first half of this time a weight of five to ten pounds is used. The remainder of the pressing time is done with only the weight of the tool. Unless specified otherwise, all my polishing and figuring session will begin this way. I very rarely hot press my laps except when initially built or after some traumatic event. I feel that once the lap is in good contact, cold pressing is all that is required.
Sunday, July 21, 2002
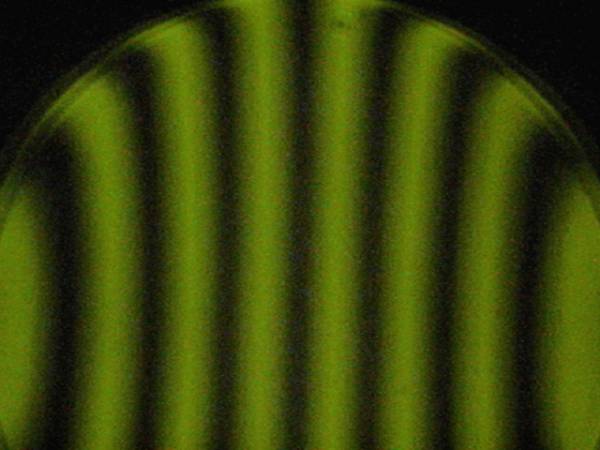
I polished for 15 minutes. The lap started grabbing a little, so I quit and pressed for about 30 minutes. A continuation of the polishing session was done for 20 minutes. The lap performed better this time. I used long strokes with no side overhang. The mirror was tested at the end of this session. The turned edge looks better and the overall surface is much smoother. The central zone area has disappeared. Some of the correction has been removed from the central areas of the mirror.
Two more polishing wets of 20 minutes and 15 minutes were done with a short cold pressing between. The strokes were not allowed to reach the edge of the mirror in their side to side motion. The turned edge has not changed. The lap channels are closing up fast. The force to move the lap has become almost too hard for me to control the lap well.
I pressed the lap with window screen for an hour. I removed the screen and pressed for another 10 minutes. The lap contact and behavior was now much better. The lap was making a loud, high-pitched (pun intended) screeching sound with each stroke. I did two sessions of 20 minutes and 10 minutes with a 15 minute press between. I found a broken cleat again so stopped the second session early.
Tuesday, July 22, 2002
A polishing wet of 25 minutes was performed. In order to try to attack the turned edge, I tried a chordal stroke. I made the strokes about 4" to 6" long and kept the center of the (9.5") lap about 1" to 2" in from the edge of the mirror. I continued this for about 10 minutes and then switched to a long narrow "W" stroke for the remaining 15 minutes. I was a little wary of doing too much of this type of stroke.
This action had little effect on the turned edge. If anything, it may have made the extreme edge worst but may have helped the rolled area leading up to the sharply turned portion. The overall correction of the mirror's central area has not changed that I can see.
Friday, July 26, 2002
A 30 minute polishing wet was done. I decided to try a Tom Waineo "semi-stroke". This was something that he often recommended for smoothing a curve and blending zones. I started with the lap centered on the mirror and then stroked away from me until the lap overhung the mirror's edge about 2". I then stroked back to center. This center-out, back to center, stroking was done for the full 30 minutes session.
The results of this polishing session were encouraging. The edge has changed only a little, but the center of the mirror is becoming oblate. That seems to tell me that something is happening in the outer zones and the stroke has promise to help the turned edge since the center seems to be "rising". I am guessing that much of the action was centered just inside the 70% zone. The area of the mirror from about 60% to 70% looks flatter (more spherical) and the center more oblate. Perhaps a longer version of this semi-stroke will help the area closer to the edge.
A second 30 minute session using a long semi-stroke was performed. I lengthened the overhang of the lap to about 4" during this session. The rolled area of the edge seems to be responding, but it's hard to tell if the extreme edge is being helped. The oblate area in the center seems to be spreading outward slightly. This stroke may work on the edge, but it is going to take considerable work and I need to watch the center so that it doesn't become too oblate.
Saturday, July 27, 2002

I pressed the lap with window screen for 1 hour followed by 30 minutes of cold pressing with just the lap. I then did a 20 minute session using rather long semi-strokes. Each stroke started with the far edge of the lap 1/2" from the far edge of the mirror. The lap was stroked out about 3 to 4 inches and then back to its starting point.
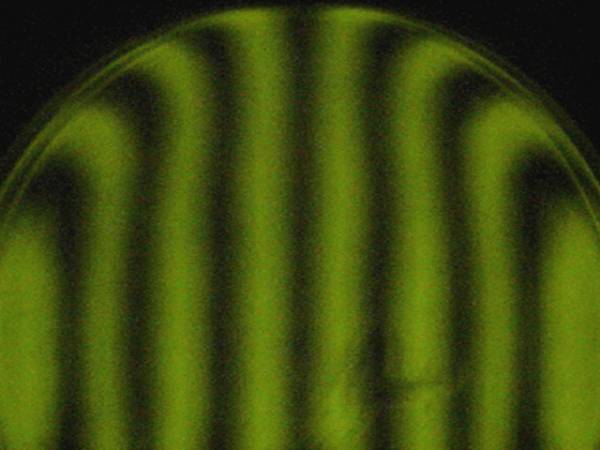
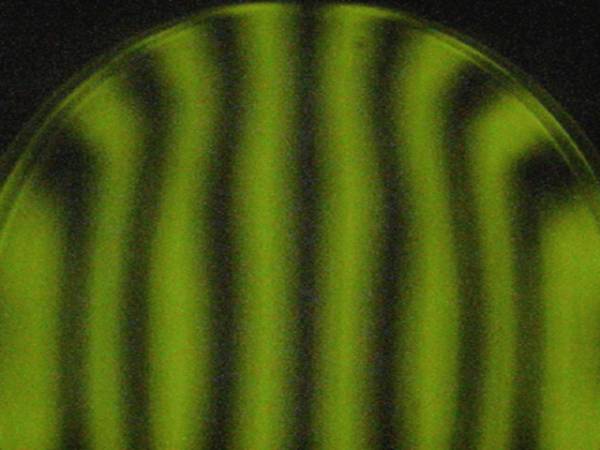
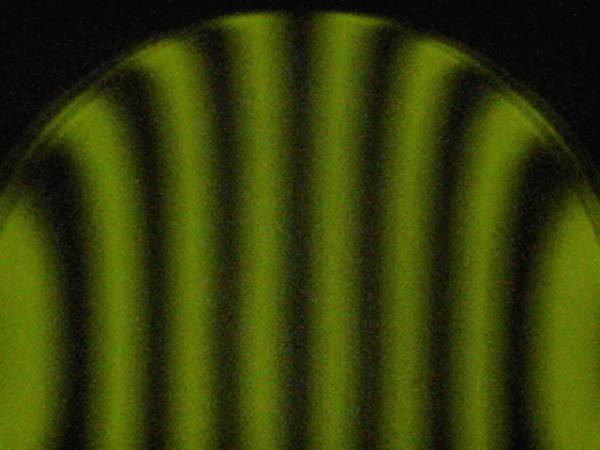
Figure 9 at left shows the mirror following this treatment. The turned edge has changed only slightly if any at all, but the central region of the mirror is becoming decidedly oblate. The turned edge is just over 1/4" wide as measured at the top of the first off-center band. I am not worried about the loss of central zone correction and will continue this treatment to see if the edge continues to respond. At the end of this session, I once again found that one of the cleats had broken loose, so repaired it.
The relatively soft pitch lap is starting to show its age and hard use. The center channels are closed up for the most part as can be seen in Figure 10. The outermost channels are still open but have migrated outward towards the edge of the tool. The soft pitch is still able to flow well enough that the occasional pressing with window screen leaves a prominent pattern of mirco-facets. The lap continues to conform to the mirror's surface quite well, so I will delay re-channelling until I can rid the mirror of its turned edge. At that point, I will re-channel, hot press, and change over to polishing with rouge. I can then start into the final figuring stage.
Sunday, August 04, 2002


I polished for 25 minutes concentrating on the edge. The first fifteen minutes were done using strokes that started with the tool overhanging the mirror by 1/2" and going out to an overhang of about 4". The last 10 minutes consisted of very long, narrow "W" strokes. The tool overhang at the start and end of the strokes was about 3" to 4". The "W" strokes were just wide enough to take the edge of the tool even with the edge of the mirror at each side.
The results of this session were about the same as previous efforts. The edge seems to be responding very slowly. The central area of the mirror is still slightly oblate but has not become more so. Finishing with the long, narrow "W" strokes seems to have worked in keeping the mirror from becoming too oblate while working on the edge. The edge is showing a wide rolled area roughly 1" wide with a steep turned portion just less than 1/4" wide. The Foucault image in Figure 13 shows the extent of the turned edge. The knife edge was set close to the radius of curvature of the wide edge zone. The extreme edge of the mirror clearly shows the steep curvature at the edge.
Monday, August 05, 2002

I polished for 30 minutes using the same technique as the last session. I first did 20 minutes of polishing concentrating on the very edge of the mirror. Strokes started with 1/2" of tool overhang, went out to about 4" of overhang and then back. Following this treatment, I pressed for a few minutes and then did 10 minutes of polishing with very long, narrow "W" strokes. Towards the end of the session, I applied a small amount of rouge rather than CeO. I will need to re-channel the lap before I can start figuring with the slower acting rouge. The lap is starting to misbehave more often now. It is in dire need of being re-channelled. Only a small improvement in overall figure was noted. The edge may be just a little better; it's hard to tell. The Foucault image in Figure 15 may indicate that the rolled area is narrower, but the steep slope at the very edge is still quite evident.
Sunday, August 11, 2002
I finally re-channelled the pitch lap. It had been getting to a point that its action was no longer smooth. The grabbing and jerking while working made it too hard to control effectively. I used my normal hot channel cutter method to re-cut the channels. Because this method does not affect the shape of the lap, no hot pressing was required. I pressed with window screen for 30 minutes followed by another cold press session of 30 minutes. The action of the lap seems pretty smooth again. No real polishing was done today. The lap is now ready for another session tomorrow, though.
Monday, August 12, 2002
I polished with the new lap for 20 minutes using rouge rather than cerium oxide. The full session actually took about 30 minutes because I paused after 10 minutes of polishing to repress the lap for a short time. I used the same semi-stroke I have been using concentrating the action near the edge of the mirror. I noticed that the lap is actually very soft -- much softer than I had originally thought. I could see the lap flowing after only 10 minutes of working. This was most visible where the lap started to overhang the edge of the plaster base. The lap's softness is probably due to the 94°F (and higher) afternoon working temperature in my garage. It is possible that I will have to completely rebuild this lap before finishing figuring.
I tested the mirror after the 20 minutes of figuring. The results may be seen in Figures 17 and 18. The testing was done fairly early in the evening and I had a lot of trouble with turbulent air currents in the house. (I did not allow much cooling time for the mirror after bringing it inside. In addition, the house was still cooling down from the heat of the day since I left the air conditioning off for much of the day.) Once again, it hard to judge how much (if any) progress was made. My figuring sessions of about a half hour are just not enough to see radical changes. I think the edge may still be improving. Maybe it is just wishful thinking on my part. The Foucault image seems to show slightly less of an abrupt change in slope near the extreme edge. (It is sometime hard to see some of the differences in the images here since they are not all taken at exactly the same offsets and under the same conditions.) There seems to be slightly more oblateness in the central area again.
Tuesday, August 13, 2002
For today's figuring session, I worked for about an hour. Only the long semi-strokes were used. These were again concentrated on the edge. Actual figuring time was about 40 minutes. Every few trips around the barrel, I stopped to cold press for a minute or two. Before the session, I loaded the lap with rouge, painted it over all the facets and allowed it to dry. I then did the normal cold pressing for 30 minutes. This embedded the rouge in the lap's surface such that I didn't need to add anything but water for the rest of the working time. The lap was working very well, but the drag while using rouge has increased greatly. Each stroke takes several seconds to complete. I allowed the lap to run almost dry, with only a hint of water visible on the mirror. This very high drag has nearly destroyed the lap, however. Most of the channels have already closed back up and the pitch is now overhanging the edge by nearly a half inch. Figure 19 shows the condition of the lap with pitch that was "squished" over the edge by the heat and polishing forces. It will have to be trimmed before another use and may not last much longer at this rate. I am sure the high temperatures are causing the lap to flow much more than usual.
Once again, it is very hard to tell if I have made any progress or not. There seems to be very little change. After over 5 hours of polishing on pitch, I am now starting to think about more drastic actions. I think the next step may be to build a small polishing tool and try to attack the edge more directly. About the the only benefit of all this is that the mirror should have an excellent polish now. It has undergone four hours of polishing on pads and five additional hours on pitch. I should just count all that as polishing time and see what else I can do to attack the turned edge. Before going farther, though, I will try to get a quantitative measurement of the edge to see just how much work I have ahead of me. If I can get the mirror to a point that the edge is focusing about the right amount for a paraboloidal figure, I can possibly start working on the center and mid zones and hope that it all comes together at the same time.
Thursday, August 15, 2002
I did a couple of center-to-edge radius of curvature measurements with the Foucault test setup. I tried to measure the difference to see how bad a turned edge is really present. The measurements showed that the area within about 1/4" of the edge focuses about 9mm beyond the central zones. A very tiny sliver less than 1/16" wide focuses farther out than that. It was hard to gauge, but looks like the radius of curvature of the extreme edge was located about 14mm to 16mm behind the center. My target parabola should have an edge that focuses about 5mm longer than the center. This is quite a bit of turned edge, but I should be able to polish it out with continued work. I will postpone the small tool for a while and see how much progress I can make in another few hours of work. If my current 9.5" needs to be rebuilt soon, I may also pour a smaller lap for use in case it is needed.
Friday, August 16, 2002
The lap was trimmed to remove the pitch overhanging the edge. After trimming, the lap was cold pressed with window screen for 30 minutes followed by another 30 minutes of normal cold pressing. I then did 35 minutes of figuring, stopping to press the lap after every five minutes or so. I alternated two types of strokes for each five minutes of figuring. I used some short semi-strokes over the edge. These strokes were only about one inch long and had the center of lap about one inch in from the edge of the mirror. The other strokes used were very long, very narrow W strokes. For these, the lap was allowed to overhang the edge of the mirror about 3 inches at each end of the stroke. The side play in the W stroke was such that the edge of the lap was not allowed to come any closer than one inch from the edge of the mirror. Once again, I allowed the lap to get quite dry. There was only a hint of water film on the mirror's surface during most of the session.
The complete figuring session lasted about an hour. Figure 22 shows the mirror following this treatment. It looks like this figuring session made good progress. There is noticeably less "hook" at the very ends of the Ronchi bands. Both the extreme edge and the rolled area just inside the edge look better. If I can duplicate the results of this session, I may be able to get the edge in shape within another hour or two.
Saturday, August 17, 2002
After cold pressing with window screen for 30 minutes and again with just the lap for 30 minutes, I figured for 40 minutes (polishing time). I would figure for about 5 minutes at a time and then press for about 2 minutes. The session took just over an hour. The lap has begun to overhang its base again and will have to be trimmed before starting another session. The strokes used for this session were similar to the last. I used very short (1") semi-strokes with the center of the lap about 1.5" from the edge of the mirror. These were used for all but the final 5 minutes of figuring. The last 5 minutes used very long, very narrow W strokes.
Figure 23 shows the condition of the mirror after this session. The edge continues to look a bit better, but it is obviously going to take a lot more work. Since there was not much work on the center in this session, that portion of the mirror has become more oblate again.
Monday, August 19, 2002

I preceded today's figuring session by trimming the 1/8" of overhanging pitch from the lap and then pressing with window screen for 30 minutes followed by plain pressing for 30 minutes. I worked for just over an hour, stopping to cold press for a minute or two every five minutes. About 45 minutes of actual figuring was done. I used long, narrow W strokes during the whole session just to see the effect. I was trying to separate the action of the semi-strokes from that of the narrow W strokes. I was also trying to smooth the surface a bit. It had begun to look rough from the grabbing of the lap during the previous figuring session. The lap was just beginning to grab some when I stopped this session.
Figures 24 and 25 show the results. The surface does seem much smoother following this treatment. It also looks like the rolled area near the edge has gotten a little better. There is no appreciable change in the extreme edge. This is still very prominent in the Foucault image.
Tuesday, August 20, 2002
The figuring session today started with a 20 minute cold pressing period. I then worked for about a half hour using more long semi-strokes centered near the edge. Actual figuring time was about 20 minutes allowing for the short cold pressing every few circuits of the barrel. Figure 26 shows the mirror following this session. There was little or no overall change in the surface shape. The edge looks just the same. The central area seems a little more oblate. The extreme edge looks like it is worse than before. This can be best seen at the very top of the center Ronchi band. The very narrow "T" shape of the center band shows the very steep area of the outermost 1/16 inch.
Thursday, August 22, 2002
I did some extensive cold pressing before the figuring session today. I pressed for one hour with the window screen to get a very good impression in the facets. I followed this with one hour of normal pressing. The lap worked very smoothly. I figured for about 30 minutes. Since I stopped to cold press after every two trips around the barrel, total figuring time was about 20 minutes. I used only semi-strokes. Each stroke was only about 2" long, but they were allowed to overhang the mirror such that the center of the lap was centered about 3/4" in from the edge of the mirror. To keep the lap from tipping at this extreme overhang, I kept the center of pressure on the lap on the near side using the heel of my hands. This was sort of like the parabolization methods that attempt to use the edge of the lap. I was trying to use the edge of the lap to work the middle and outer zones of the mirror.
The results of this action are shown in Figure 27. It was a failure. The rolled edge got steeper. The center became more oblate as expected, but the overall effect was of no help in improving the edge. Because of the added pressure on the edge of the lap, the pitch mushroomed out over the edge again. It was overhanging the edge of the plaster base by just more than 1/8". I finished up the evening's work by trimming this excess from the edge of the lap once again.
Friday, August 23, 2002
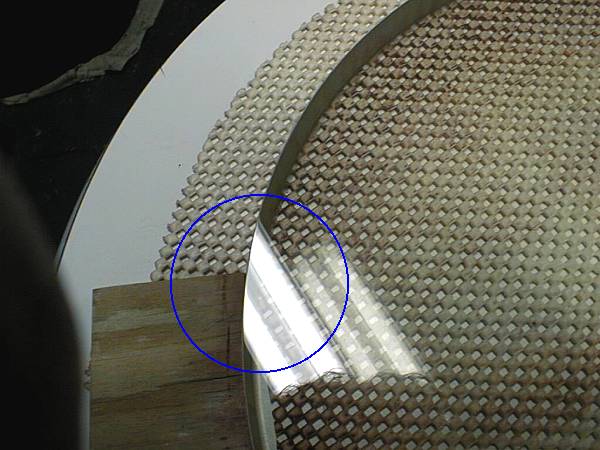
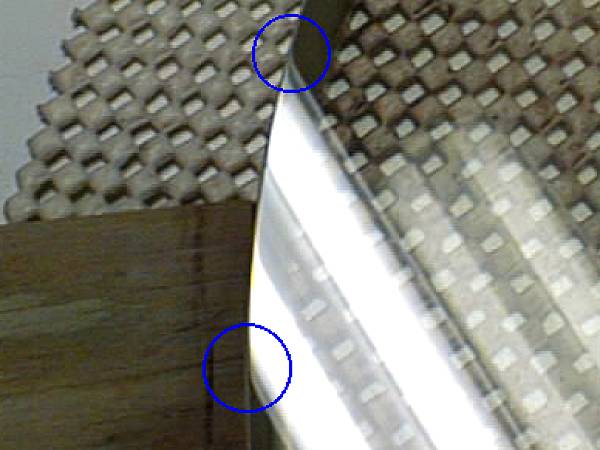
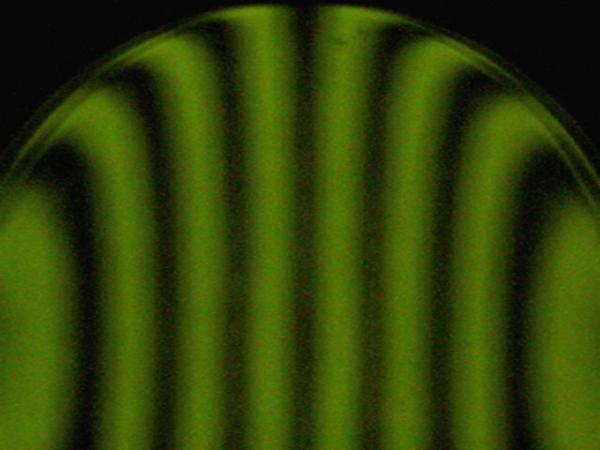
While checking the mirror's surface for scratches, I noticed that the image of my overhead florescent light tube appeared to be bent at the point it exited the edge. If I move so that the image is offset to a chord very near the edge, the effect is very easy to see. Right at the extreme edge, the image bends sharply inward, just like the "hook" seen in a Ronchi image taken inside the radius of curvature. The width of the area causing the hook is the same as that seen in the Foucault test -- about 1/16 inch. The effect was so pronounced, I found that I could actually photograph it directly with the camera.
Figures 28a and 28b show this effect. The areas to look at are those circled in blue. Look for the image of the florescent light bulb to bend along the edge of the mirror as it leaves the surface. The bend is in the direction of the centerline of the mirror (up and to the right in the photo).
Sunday, August 25, 2002
Today, I poured a plaster base for a small 4" pitch lap. The plaster was poured to a thickness of 3/4". I allowed the plaster to wet cure for three hours and then air dried it for four hours. I sealed the back and sides with epoxy. Tomorrow, I plan to seal the front side and then pour the pitch on Tuesday. I will try working the edge with this small lap to see if I can reduce the turned edge. Even if the very edge doesn't respond, I'm sure I can bring the remaining rolled area under control.
Monday, August 26, 2002
I sealed the top (pitch) side of the plaster base for the small figuring lap. I also found a couple of small areas around the side of the plaster than were not covered well with epoxy. I added a small amount of epoxy to these areas to ensure a complete seal. The epoxy was left to cure overnight. I will try to pour the lap tomorrow.
Tuesday, August 27, 2002
I poured the small figuring lap this evening. I started with the same batch of pitch which was used for the 9.5" lap. It already included the recycled pitch from the larger lap since I use the pitch can to catch the pitch which is melted off the lap in my trimming and re-channelling operations. This recycled pitch should be a bit harder than the original batch. I added about 4 cubic inches more of the old, dried Edmund's pitch to the can to further harden it. In addition, I heated the pitch until it was quite hot and starting to boil. Hopefully, this slightly harder pitch will allow the small lap to work a little better at the high temperatures in my garage. (The temperatures out there have a bit higher this week. We have hit over 100°F the past three days here in central Texas. Now, it's finally starting to feel like Summer.)
After the pitch was very hot and liquid, I turned off the heat and allowed it to begin to cool. Since the curve across a 4" lap is so small, I decided to just pour the lap as a flat slab on the plaster base and then press into contact. I don't usually like to do it this way, but pouring on the mirror seemed like overkill for such a tiny sagitta. Masking tape was wrapped around the plaster to form a dam just less than 1/4" high. I painted a six inch diameter of CeO slurry in the center of the mirror.
As the meted pitch began to cool and thicken, I stirred it constantly. When it reached the viscosity of honey, I poured it onto the plaster. I allowed it to completely fill the making tape dam. After allowing it to cool for about two minutes, I sprayed water onto the mirror's face and the warm pitch. I stripped off the masking tape and pressed the lap onto the mirror. I removed the lap and pressed once more. A small area in the center was still not making good contact, so I placed my circle of window screen on the mirror, put the lap on top and pressed with about five pounds weight for about five minutes. The window screen was removed and the lap pressed again for another five minutes. At this point the lap contact was good.
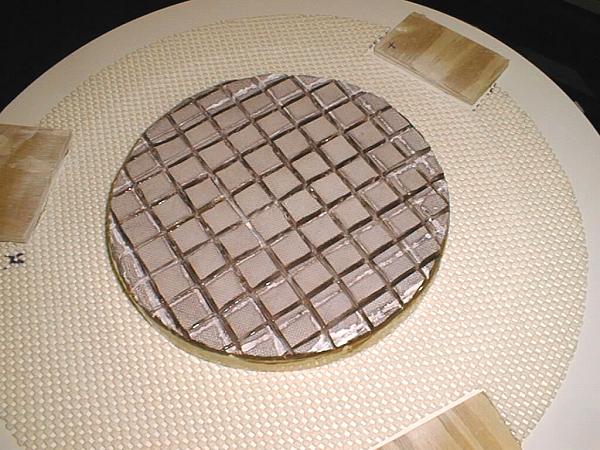
I washed the lap and cut the channels using my favorite hot channel cutter method. I did not cut the channels all the way down to the base. They are only about 3/32" deep. I made them rather shallow because this lap should not need to flow much and I wanted it behave a little harder than it really is. After channelling, I pressed the lap with window screen once more for about 15 minutes. Finally, I removed the lap and inspected it. It looks like it is ready to use. I painted the lap with rouge and allowed it to dry. I am ready to cold press and start a figuring session. Figure 29 shows the lap at this point. It will probably be Thursday before I see how well this lap works.
Wednesday, August 28, 2002

I managed to get enough time for a short figuring session with the small lap. I figured for about five minutes. This was five circuits around the barrel with a two short pauses to repress the lap. The lap contact was good but the action was very stiff. I found it very hard to control the lap. The force required to move it was nearly the same as the larger lap. Whenever I stopped to press, I did so with window screen for 30 seconds or so and then without for a minute more. This helped the lap's action. I used a radial stroke similar to the semi-strokes I used before but shorter. At the start of the stroke, the edge of the lap was about 1/2" from the edge of the mirror. The stroke took the lap out until it overhung the edge of the mirror by about 1 inch.
Figure 30 shows the results. Nothing drastic happened, so I will assume it is safe to try longer sessions. I think 10 to 15 minutes should be safe enough to try next. The Ronchi image seems to show a little more oblateness in the center. In addition, the center line no longer has its prominent "T" crossbar at the top edge. The bands are not as dark and sharp as before. This may be due to the turbulent air in the house since it had not yet cooled down from the heat of the day. I will try a longer figuring session tomorrow.
Thursday, August 29, 2002
I worked with the small lap for 10 minutes of figuring time. Before starting, I cold pressed with window screen for 30 minutes and again without it for 15 minutes. During the figuring session, I stopped to press for a minute after each circuit of the barrel. The drag of the small lap was still very high, so I added a few drops of CeO. This seemed to reduce the drag enough that I could properly control the motion of the lap during figuring. I once again used a radial stroke. Each stroke started with the edge of the lap about 1" from the edge of the mirror. The lap was pushed out to an overhang of 1/2" and then brought back to the starting position. The line of each stroke was made about 1/4" from the previous.
Figure 31 shows the mirror following this session. Again, there was nothing too drastic happening to the mirror. I assume that another session this long or a bit longer will be safe. Some progress may have been made, so another session will be done the same way. The area out around about the 80% zone seems to have become more spherical. Another figuring session should start to show just where the action is taking place.

A second, longer figuring session was done. This session consisted of 25 trips around the barrel and amounted to about 20 minutes of figuring time. The lap was cold pressed for a minute after every other circuit. The same strokes as in the previous session were used. Figures 32 and 33 show the results. I can see the changes starting to occur now. The oblateness in the center is spreading outward, amounting to a reduction in the overall "correction" on the mirror. Hopefully, as the correction is removed from the outer-most zones, the edge will start to look better. It will take a lot of this work to get rid of the 1/4" rolled edge and I may never get rid of the steep turned edge in the outer 1/16 inch. Once the majority of the mirror is brought under control, I can make the final decision of how much of the edge to mask. The rough action of the small lap can be seen in the Foucault image as many small, shallow radial defects in the outer 3" of the mirror. A quick measurement of the rolled edge showed it to focus at about double the distance expected for a parabola.
Saturday, August 31, 2002
I worked for about 40 minutes today figuring with the small lap. This amounted to about 15 minutes of actual figuring time. I again cold pressed briefly after every other trip around the barrel. I also had to stop after about 10 minutes of figuring to cold press with window screen after the lap started to grab and misbehave. The strokes were the same as previous sessions -- radial strokes of about 1.5" length centered about 1" in from the edge of the mirror. Figure 34 shows the results. There are obvious changes occurring in the outer zones of the mirror. This seems to be moving things in the right direction. The radius of curvature is being reduced starting about 3/4" in from the edge. I would like to move this outward in the next few sessions to eat into the rolled area near the edge. I still have a considerable amount of work to do before I can start to smooth the surface again. I will continue to use the same strokes in the next few sessions to reduce the radius of curvature of the edge even more.
Tuesday, September 3, 2002
I made a small micro-lap figuring tool. It is a small 1.1" section of aluminum bar stock about 1/2" long with a 1/4" thick covering of pitch on one end. I used this tool for about 5 minutes of figuring very close to the edge. The tool was used with three types of strokes during this time. First, a radial stroke similar to my previous efforts was done. I made two quick circuits around the barrel with this stroke. This was followed by an elliptical stroke about 2" wide with about 1/4" of overhang. Again two trips were made around the barrel. Finally, the tiny lap was dragged around the periphery of the mirror about 1/8" in from the edge. I made three trips around the barrel with this treatment.
After using the tiny lap, I went back to using the 4" lap. I did 10 minutes of work using the radial strokes I have been using with this lap. The strokes were about 2" long and were allowed to overhang the mirror's edge by about 1" at the end of each stroke. Figure 35 shows the mirror after this session. While the image is starting to show a fairly ugly mirror, it appears that some progress is still being made. I will continue to work with the micro-lap and small lap for more treatment of the edge. The radius of curvature of the area just inside the edge seems to be decreasing slowly. At least this is going the right direction. I can smooth and blend the surface once the edge comes down more.
Sunday, September 8, 2002
I worked with both small laps for about 20 minutes today. I first used the 1" micro-lap in a chordal stroke for 10 minutes. I used strokes about 2" long parallel to the edge of the mirror. Lap overhang was about 1/8" for the first circuit of the barrel. on each subsequent trip around, I moved inward a little bit, much like a phonograph record. About 10 trips around the barrel were done this way.
Next, I used the 4" lap. I started with a similar stroke -- a chordal stroke about 2" long with about 1/4" of over hang. I worked for five minutes at this, again making each trip around the barrel with less and less overhang. After five minutes, I cold pressed for five minutes and then used the radial strokes I had been using before for another five minutes. The radial strokes were short (about 1.5" long) and reached a maximum overhang of about 3/4" at the end of each. My tester was out of commission due to computer problems, so I took a quick look visually. The results were pretty ugly, but it looked like progress had been made. There was a sharp zone of shorter radius of curvature just inside the edge. The extreme edge was still showing the steep roll but was narrower. I decided that I should start to blend this new radius into the rest of the mirror's surface before going any farther.
Monday, September 9, 2002
I figured for 15 minutes using the 9.5" lap. Only radial semi-strokes were used. They were relatively long -- about 4". I allowed about 3" of overhang at the end of each stroke. At the end of the session, the sharp zone previously seen was starting to broaden and blend in with the rest of the surface. Another session similar to this should bring the mirror back closer to spherical (although with the turned edge still present).
Tuesday, September 10, 2002
I figured for 20 minutes more with the 9.5" lap. During this session I used long, relatively narrow W strokes. The strokes were allowed to overhang the mirror's edge by about 3" at the top and bottom of the W and about 1" at the sides of the W. As usual, I cold pressed for a minute or so after every other trip around the barrel. Figure 36 shows the results of the three previous figuring sessions. The inner edge of the sharp zone caused by the small laps is still visible, but is small enough not to worry about at this time. I now need to go back to the small laps and do the same thing again -- dig a trench just inside the edge and then blend it inward. That is the current figuring plan. I will use the small laps to shorten the area at the edge and then the larger lap to blend in the central area. This image seems to show some progress, so I think this strategy will work. We'll see...
Saturday, September 14, 2002
Today, I first figured for about 10 minutes with the 1" lap. I again used short chordal strokes starting with about 1/8" of overhang. After each trip around the barrel, I moved in slightly. During the 10 minutes of figuring, I made 8 trips around the barrel. Following that treatment, I pressed the 4" lap with window screen for 45 minutes and then without for 20 minutes. A 6 minute figuring session was then done using chordal strokes. The strokes followed the same procedure as the for the micro-lap. I started with about 1/4" of overhang. The strokes were about 2.5" long. Each trip around the barrel, I moved the strokes inward by about 1/4". Contact was very good. The lap was making rather loud, high pitched squealing noises during the whole session. After 5 circuits of the barrel, I stopped to cold press for about 15 minutes.
Following the cold pressing cycle, I resumed figuring using a 4" long radial stroke. The lap was allowed to overhang the edge of the mirror by about 1" at the end of each stroke. Two circuits of the barrel were made with this stroke. I next used a very short (1.5" long) radial stroke. This stroke also ended with a 1" overhang. Three circuits around the barrel were made. I started back using the longer radial stroke but was interrupted after only two circuits of the barrel. I decided to stop at that point and test. Figure 37 shows the mirror at this point. This is very much like the state of the mirror following my previous use this technique. It looks quite nasty but use of the 9.5" lap blended the zones in nicely last time. I will do another sequence of micro-lap and 4" lap like this before going back to the larger lap to smooth the surface.
Saturday, September 14, 2002
I pressed both the micro-lap and 4" lap with window screen for about an hour. Unfortunately, I used too much weight with the micro-lap. When I removed it from the window screen, it tore sections of pitch from the surface. The gaps and holes are rather large. It will take quite a bit of reworking and hot pressing to return it to functionality. Because of this, I skipped using the tiny lap for the figuring session. I pressed the 4" lap without the window screen for 20 minutes before starting.

I only figured for about 15 minutes. Lap contact was excellent. Once again, the figuring session was accompanied by a loud screeching sound. I first did two circuits using long chordal strokes right at the edge of the mirror. Two more circuits were done with the edge of the lap inside the edge of the mirror by about 1/2". The next two circuits used the same chordal strokes with the edge of the lap about 1" inside the edge of the mirror. I stopped to cold press for 5 minutes at this point. Finally, the session was completed with 6 circuits using radial strokes. The first two circuits used strokes which were about 4" long. The next two circuits consisted of 1.5" long strokes. The last circuits used 3" strokes.
Figure 38 shows the current mirror state. The extreme edge was not affected as much as I had hoped but the mirror as a whole shows definite oblateness. The micro-lap would have been able to more affect the extreme edge area. Given the sharp zonal edges at about 85% - 90% of the mirror radius, it is hard to tell what the edge will look like once the center is deepened and blended into the rest of the curve. My next session will be to blend the curves back together using the 9.5" lap.
Sunday, September 15, 2002
Today's figuring session started with a little more work using the 4" lap. I cold pressed well and then did about 5 minutes of work. The first half of that time was devoted to chordal strokes right at the edge of the mirror. The last half of the session consisted of short (2") radial strokes.
After using the small lap, I cold pressed the 9.5" lap. I figured with it for 20 minutes. For the first 10 minutes, I used radial strokes of about 4" length. Overhang at the end of each stroke was about 3". The last 10 minutes consisted of long W strokes. The strokes were allowed to overhang the mirror about 3" at the top and bottom of the W and about 1" at the sides. The lap contact was good, but drag made it hard for me to control the strokes well.
To counteract the heavy drag and poor control, I used more CeO and water than normal, making a very sloppy mixture. The lap wanted to hydroplane with very little friction. I doubted that much polishing action was taking place. Figure 39 showing the mirror's surface, confirms this. It doesn't seem that much smoothing was accomplished for 20 minutes of work. The lap's channels have fully closed. It is time to re-channel the lap so that I can use a soupy mixture and still get good contact without the lap wanting to float on the very thin layer of water. After re-channeling, I will do another long session with the 9.5" lap.
Monday, September 16, 2002
I re-channeled and trimmed the 9.5" lap this evening. The lap is starting to get thin. It is now just barely over 1/8" thick. The temperature in my garage has dropped into the upper 80°F range the past few days. Since both of these factors will make the lap act a little harder, I decided to make the channels 3/4" apart rather than 1" as I had previous done. This should allow me to more easily keep good contact. After the re-channeling, I cold pressed with window screen for 20 minutes followed by pressing without the screen for another 20 minutes. When I started figuring, the contact was great and the action very smooth. The drag was not overly heavy and there was no tendency to hydroplane across the mirror.
I worked for about an hour total time. Only about 25 minutes of actual figuring time was accomplished during that period. I figured for 10 minutes with short cold presses every few trips around the barrel. after 10 minutes of figuring time, I stopped to cold press for 10 minutes. I then worked again, getting another 15 minutes of figuring time. The strokes used during the whole session were medium length W strokes. Overhang at the top and bottom of the W was limited to about 2" to 2.5" while the overhang at the sides of the W was about 1". I was attempting to both smooth the figure and add correction to the center of the mirror.
Figure 40 shows that this is just what was happening. The sharp zones caused by the small tools are being blended into the rest of the curve and a small amount of the oblateness has been removed. I will next do another long session just like this one. I would like to add enough correction to the center to be able to judge just how much farther the edge needs to be corrected. There is not much sense in going all the way to a sphere since I will need correction in the outer zones before I am done anyway. At this point, it looks like I will need one or two more cycles of the small tool work to clean up the rest of the edge. I have resigned myself to painting over the outermost 1/16" of sharply turned edge.
Friday, September 20, 2002

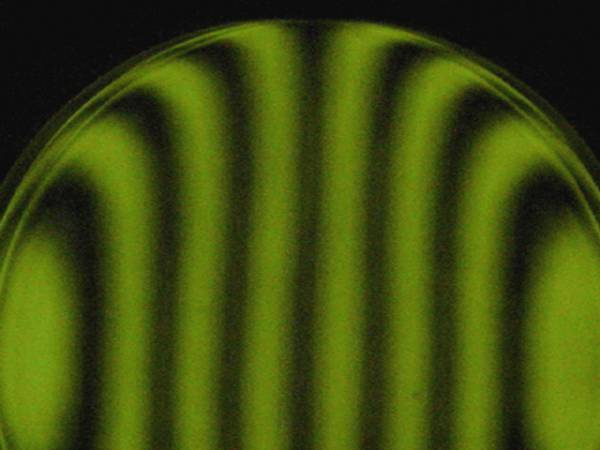
I did a 50 minute working session this evening. About 40 minutes of actual figuring was done. This amounted to only about 10 trips around the barrel. Each circuit took just under 4 minutes. I stopped to cold press for about five minutes after every third circuit. I used only W strokes with 2" to 2.5" top and bottom overhang and 1" to 1.5" side overhang. It took approximately 8 to 10 strokes to traverse each W across the mirror. Figure 41 shows the results. The curve looks much smoother and the edge roll-off has begun to be less abrupt. Unfortunately, I did not add much overall correction to the center as I had wanted. I plan to do another session like this one to attempt to get more correction into the center so I can better evaluate the rolled edge with respect to the target parabola.
Saturday, September 21, 2002
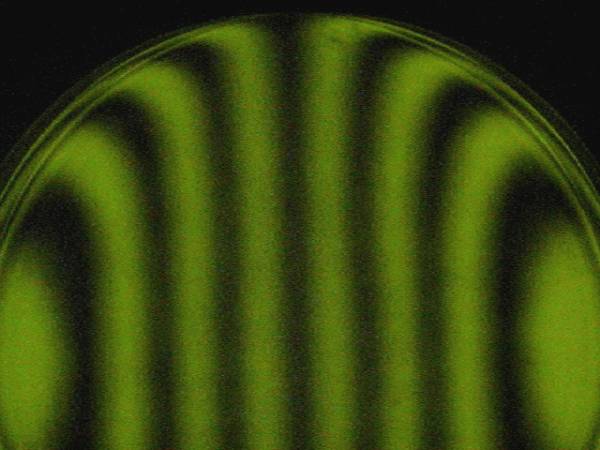
Today's figuring session lasted for 100 minutes. I did 20 trips around the barrel pausing to cold press after every four circuits. The first two cold press cycles were five minutes in length while the third was 10 minutes and the last was 20 minutes. The strokes used were nearly identical to those of the last session -- W strokes with 2" top and bottom overhang and 1" side overhang. The lap contact continues to be very good and cooler weather (it has been in the 70's and 80's) is keeping the channels from closing up too rapidly.
Figures 42 and 43 show the mirror at this point. Using slow methodical strokes is keeping the surface quite smooth as can be seen in the Foucault image. The majority (about 13") of the mirror's surface is now very close to spherical. Just a touch of oblateness can be seen in the Foucault image. The general plan at this point is to continue with what I have been doing. I may use the 4" lap for a short time to try to deepen the center a little faster, but still plan to add some more correction before working the outer 1/4" of rolled edge once more.
[09/22/2002 - I discovered that the total figuring times noted in the image captions above were understated by 15 minutes after September 14. They have been corrected.]
Sunday, September 22, 2002
I started today's figuring session with an extended cold pressing cycle. I pressed for an hour with window screen and then another hour without. Since I wanted to continue the smoothing and add some correction, I cold pressed after every three trips around the barrel to ensure that the lap kept up with the mirror. I pressed for 5 minutes during every break and an additional 5 minutes after every other break. The cold presses were 5, 10, 5, and 10 minutes respectively. The total work time was 110 minutes. This included 15 slow, methodical circuits of the barrel amounting to about 70 minutes of actual figuring time.
The strokes during this session were about the same as previously used. They were W strokes with 2" top and bottom overhang. For this session, the side to side overhang was limited to about 1/2". Figure 44 shows that the mirror has moved slightly into the shape of an prolate ellipsoid. I estimate that it is at about 8% of full correction. The change was slower than I would like to see, but the nice smoothness has been maintained. I will continue this methodology for a few more hours to see what happens.
Sunday, September 22, 2002
I worked in a second figuring session today. I preceded the session with an hour of cold pressing with window screen followed by 15 minutes of pressing without the screen. Rather than cold pressing every few trips around the barrel, I decided to work straight through, pausing only long enough to replenish the water and CeO mixture every two circuits of the barrel. I made 11 circuits of the barrel in about 50 minutes of work. Not counting the brief interruptions to add polishing agent and water, about 45 minutes of actual figuring was done. I used W strokes with about 2" of top and bottom overhang. Side overhang was negligible this time -- 1/8" or less. I wanted to concentrate more action on adding correction to the mirror. Figure 45 shows the results. Correction was increased to about 23% (estimated) of full correction. This was a little more progress than I expected. I am still planning to get to about 80% correction or so and then evaluate the edge zone again.
Monday, September 23, 2002


I worked on the mirror for 75 minutes. I used the same methods as yesterday, working straight through and stopping only to replenish polishing agent and water. Actual figuring time was about 60 minutes. Twelve circuits of the barrel were made using only W strokes. The strokes were just a little longer than before -- about 2.5" top to bottom overhang with about 1/2" of side to side overhang. I wanted to push the emerging correction a little farther out towards the edge. Lap contact was still very good but channels are nearly closed in the center. I may re-channel before the next session to ensure that the lap can flow well enough to keep up with the changing shape of the mirror during these longer working sessions.
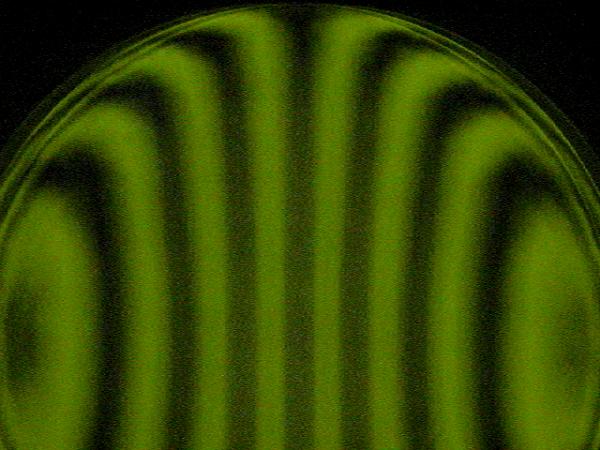
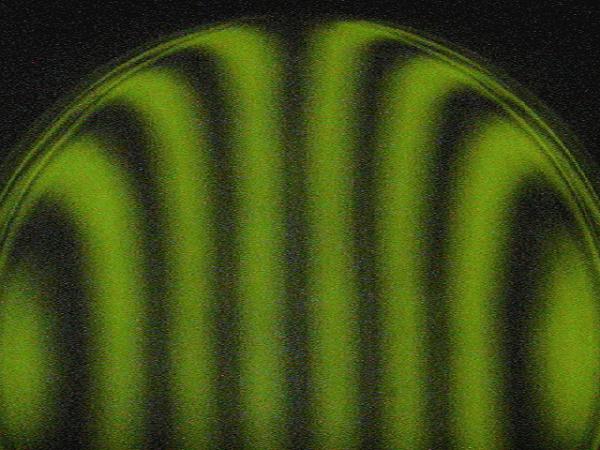
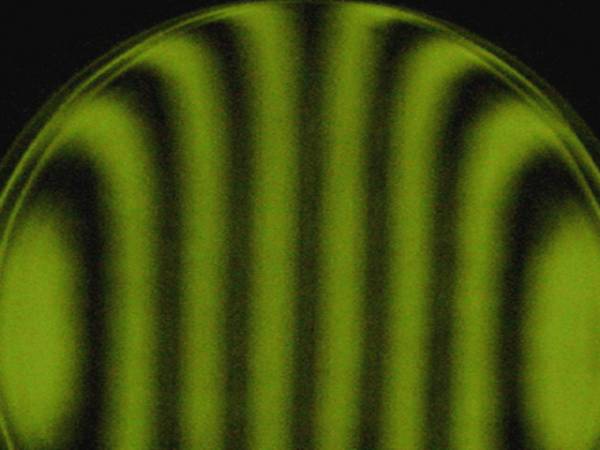
Figures 46 and 47 above show the mirror following this figuring session. Overall correction has increased and the surface remains wonderfully smooth as seen in the Foucault image. I made a couple of quick center-to-edge Foucault measurements to see how much correction had been added and the check on the rolled edge. To my surprise, the edge has come down considerably. The outer portion of the rolled edge is now focusing only about 1.5mm beyond the expected value for a 14" F/4.4 parabola. I no longer have to rack the tester way back to get the right edge to completely darken. (There is still no diffraction visibility of the left edge. I am sure this is because of the outermost 1/16" of very steeply turned edge.) It just may be possible that by the time I can add enough correction to the mirror's central zones, the edge and the center curves will meet. I am excited by the prospect of possibly not having to dig another trench around the edge to blend it with the rest of the surface.

Figure 48 shows the mirror's Ronchi image from above with theoretical grating line outlines superimposed upon it. I am now estimating the the mirror is at about 44% of full correction or maybe just a tiny bit less. Following this session, the center seems to be lagging just a little behind the edge in terms of correction. During my next figuring session, I will try to remedy this by shortening the strokes back to about 2" overhang. I will maintain the 1/2" side overhang I used during this session. If the edge continues to shorten and blend into the rest of the curve, I may be close to being able to start star testing within another three to four hours. I plan to continue to use the Ronchi test until I get close and then use the star test and Foucault test. I have been working on a new Dall Null tester and may have it ready in time for final figuring also. In any case, I will use multiple tests to confirm the final figure before calling the mirror complete.
Tuesday, September 24, 2002
I started work this evening by re-channeling and trimming the lap. The center 3" of channels had completely closed and the facets out to about 3" radius had very little room to flow. The lap is now getting quite thin. It is less than 0.10" thick. I cut the channels all the way down to the plaster base this time. I may not have enough thickness to cut channels again. Once these close up, I will probably have to make a new lap. I don't look forward to having to break in a fresh lap late in figuring but it may work out that way. After re-channeling the lap, I cold pressed against the mirror for 10 minutes. I then cold pressed for 20 minutes with window screen. Finally, just before starting to figure, I cold pressed once more without the window screen for 15 minutes. Lap contact was good when I started the figuring session .
I figured for 45 minutes stopping only briefly to add water and polishing agent every other trip around the barrel. Ten circuits of the barrel were made. Total working time was 50 minutes. I used relatively short, narrow W strokes during the session. Top and bottom overhang was about 2" and side to side overhang was about 1/2". Figure 49 show the results. No progress was made. I was surprised to find the surface nearly identical to that of the previous session. I will need to vary the stroke more in order to add more correction to the mirror's figure. Perhaps the re-channeling was partly responsible for the lack to progress. Since the center channels had completely closed, the center of the lap had been acting harder than the outside areas. This would have worked to dig out the center faster. Now, with the central area of the lap able to flow more easily, the lap's action was consistent across the whole surface. I will try narrowing and lengthening the strokes in the next session to see if I can resume deepening the center. If that doesn't work, I will try deforming the lap into a star shape to selectively act in the center.
Friday, September 27, 2002
This figuring session lasted 40 minutes. Total working time was 50 minutes. I did 11 trips around the barrel. The lap contact was not as good as I would like. I had pressed for 30 minutes with window screen and only 15 minutes without. I used W strokes having 2.5" of top and bottom overhang and no side to side overhang. I stopped to cold press for 5 minutes after 6 circuits of the barrel. Figure 50 shows the results. Once again, very little progress was made. I will try deforming the lap to a star shape for the next session. Hopefully, that will increase the required correction in the center. The surface is still nice and smooth. The extreme edge still has a rather steep roll.
Saturday, September 28, 2002
I tried using a modified lap today but the results were not what I expected. I started by cold pressing the lap with window screen for one hour. This was followed by a 30 minute normal cold pressing cycle. I then pressed in a star shape using a piece of waxed paper cut to expose a star shape in the center. The lap was pressed with the waxed paper pattern for 20 minutes. Finally, I removed the paper and pressed for an additional 10 minutes before starting the figuring session. A 40 minute figuring session was completed. Total working time was 45 minutes to complete 10 trips around the barrel. Once again, I used 2.5" overhang W strokes with no side overhang. Today, the lap contact was very good.
Figure 51 indicates that little progress was made. The middle zones may have taken on a tiny bit more correction but overall the degree of correction remains in the 40% to 45% range. I suspect that the lap did not hold the star shape for very lang because of the thinness of the waxed paper. I will try again with a thicker pattern. If that doesn't work, I will try adding central correction with the 4" lap and then smoothing it with the 9.5" lap.
Sunday, September 29, 2002

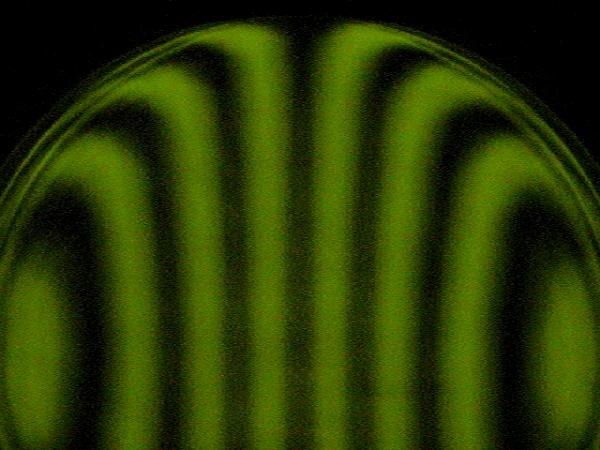
I tried another figuring session with a star lap. This time, I made the pressing pattern out of "freezer paper", also sometimes called butcher paper. The paper has a water resistant plastic coating on one side. Onto the paper side of this, I applied a sheet of adhesive plastic used for laminating. I then cut the star shape out of the center. The points of the star were long enough to reach to a diameter of 7.5" on the lap. The inner diameter of the star is about 4.5". The finished thickness of the pattern is 0.006". The waxed paper pattern I used last time was only 0.001" thick. I pressed the lap with window screen for 45 minutes. This was followed by a 15 minute normal cold press. I then pressed with the inverse star pattern for 30 minutes and then again without for 10 minutes. I then started the figuring session.
The figuring session lasted for 40 minutes. During this time, I made 12 circuits of the barrel. Initially, lap contact was very good but it worsened somewhat during the session. I lengthened the W strokes to about 3" of top and bottom overhang to compensate for the smaller active lap area of the star shaped "virtual" lap. Side to side overhang was increased to about 1". Figure 53 shows the mirror following this working session. Some small progress was made. Overall correction has increased to about 50%. The surface is still smooth. The edge is looking more turned now so I assume the correction of the central area has left the edge behind. This tells me that I will need to make one more attack on the edge with the small laps to bring its radius of curvature down before final correction of the whole mirror is completed.
Friday, October 04, 2002
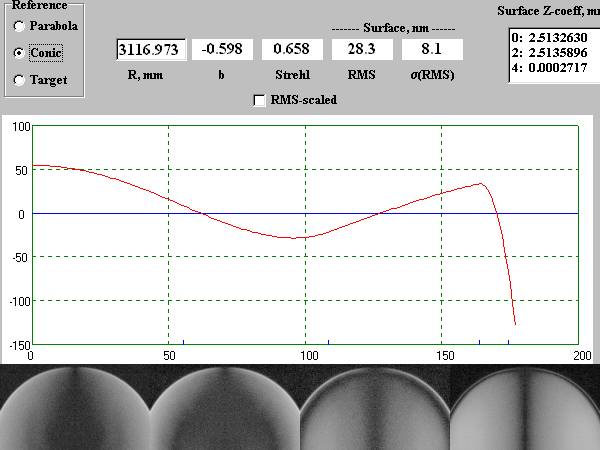
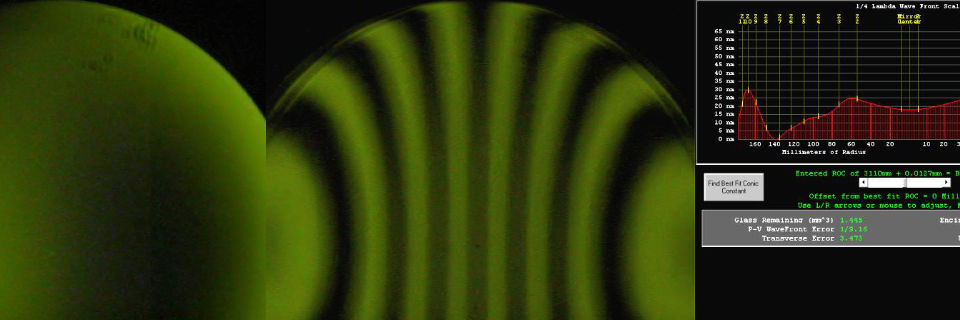
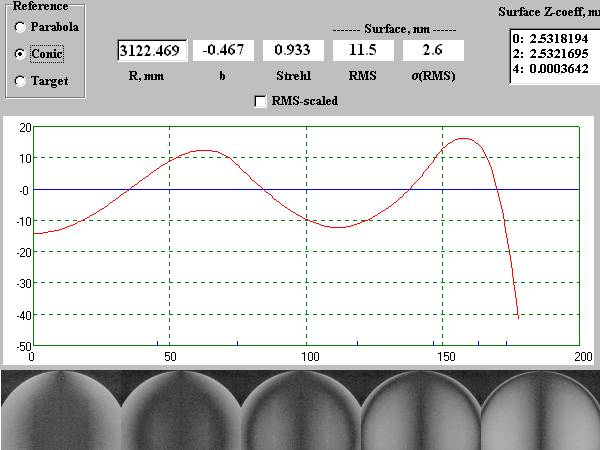
I decided to run a set of Foucault readings just to see how closely they would agree with my Ronchi assessment of the mirror. I took a series of Foucault images and then applied image processing techniques to extract Foucault test data from the images. After processing the images, I entered the data into Jim Burrows' program Sixtests as if it had been obtained from the Wire test. The data results are shown in Figure 54. At the top of the figure is the Sixtests surface plot. Below that are very small versions of the processed Foucault images. The images were taken at more or less random knife edge offsets. A formal Foucault analysis of the mirror would call for a more careful choice of zones. There was considerable uncertainty in the central zone data but the effect on the results was shown to be minimal.
In general, the Sixtests surface data analysis agrees with my interpretation of the Ronchi test. The mirror's edge is steeply rolled and the remainder of the surface is generally under-corrected. I had estimated from the Ronchi images that the mirror was about 50% corrected not counting the rolled edge. Sixtests estimated about 60% overall correction including a significant portion of the edge zone. Sixtests also shows a high center and over-corrected mid-zones which agrees with the Ronchi images which show a flatter center and a little too much curvature leading up to the edge. The steeply rolled edge shows well in both tests.
Saturday, October 05, 2002
I worked on the mirror for a short time today. About 20 minutes of figuring was done during a 30 minutes working session. Only 6 circuits of the barrel were completed. A five minute cold pressing was done in the middle of the session because the lap's action didn't seem smooth enough. Long W strokes were used. Overhang at the top and bottom of the stroke was about 3 to 3.5 inches. Side to side overhang was about 1.5 to 2 inches. Figure 55 shows the mirror after this short working session. Little change was noted. A longer session will be attempted. The lap's channels are closing up once again in the center. I will delay re-channeling as long as I can keep the lap in relatively good contact.
Sunday, October 06, 2002

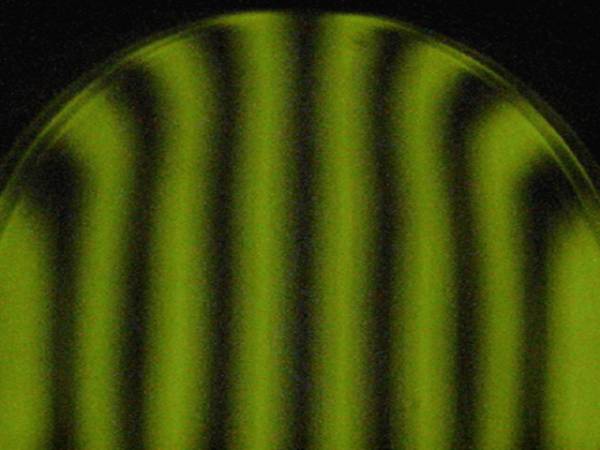
This figuring session consisted of 10 more circuits of the barrel using long W strokes. The strokes had 3.5 inches of top and bottom overhang with 2.5 inches of side to side overhang. The figuring session lasted 30 minutes. Lap contact was good during the whole session. I wanted to work more on the edge than the center. This was done by making the center-crossing portion of the W strokes very quick. More of the strokes were at the edges of the W rather than the center. Figure 56 shows the mirror following this work. The edge looks better as expected but some correction seems to be have been lost in the center. I will continue this same type of figuring action in the next session. Maybe spending a little more time across the center will help.
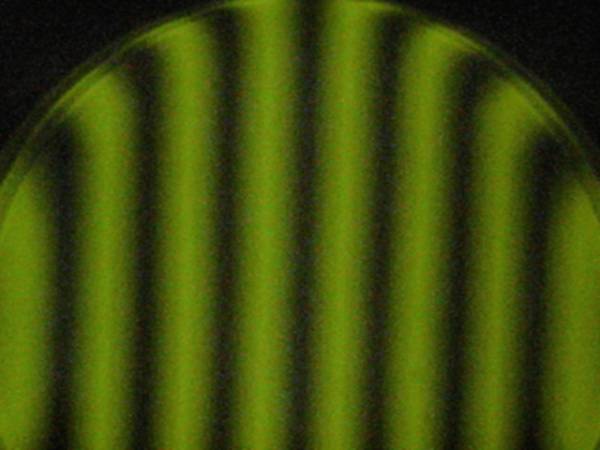
A second, longer figuring session was completed. Again, long W strokes were used. Top and bottom overhang was 3.5" and side to side overhang was 2.5". I worked for about 50 minutes with about 40 minutes of that time being actual figuring. Twelve trips around the barrel were completed. Once again, little change was noted in the mirror as seen in Figure 57. Correction seems to have increased a very small amount and the edge continues to look a little better but the mirror is still at least 1.75 waves from full correction. I am still not sure I will be able to fully parabolize this mirror with the 9.5" lap. During the next figuring session, I will attempt to add correction to the center by using long, narrow W strokes. The channels in the center 4" of the lap have completely closed now while the outer channels remain open. This might work to my advantage if I can keep good contact. The center of the lap will change more slowly than the rest. As the outer areas sink, more action should be applied near the harder center area.

Another long figuring session was performed. This time, long, narrow W strokes were used. The top and bottom overhang was 3.5 to 4 inches and the side to side overhang was about 1/2 inch. Total work time was about 55 minutes for the 12 laps around the barrel. Figuring time was 40 minutes for the session. I had to stop in the middle of the session to repair a broken cleat on the barrel top. Lap contact continues to be good in spite of the need for re-channeling. Figure 58 shows the mirror following this work. Correction seems to have increased very slightly. There was little or no change in the edge. I should take another set of Foucault data to see where the changes are being made to the surface. The overall surface shape remains quite smooth. I will continue with this treatment to see how much correction can be added with the large lap using the long, narrow W strokes.
Saturday, October 12, 2002
I took another set of Foucault images to get a reading of progress on the mirror. The images were taken at offsets 0.5 mm apart starting near the edge zone and working inward. This worked out pretty well. I was able to measure six zones before the images became too ambiguous to read consistently. (Only five of the images are shown at the bottom of the figure.) The results were entered into Sixtests as Wire Test data as before. Figure 59 shows the surface plot. It shows less overall correction than the previous measurements but I think this is misleading because the rolled edge has improved and is no longer contributing extra "correction" to the overall surface. The average correction was calculated to be about 47%.
Monday, October 14, 2002
I attempted a figuring session today but was unable to finish. The session started with cold pressing the 4" lap with window screen for about an hour. It was then pressed normally for another hour. The lap was used with a W figuring stroke spending most of the time in the center 10" area of the mirror. The lap's edge was only allowed to reach the edge of the mirror with no overhang. Two circuits of the barrel were done this way. The 4" lap was then used with a short chordal stroke around the edge of the mirror. The lap was allowed to overhang the mirror by about 1/4". Lap contact was great during all this figuring with the small lap. It constantly made a loud squealing sound as I worked.
I next pressed the 9.5" lap for an hour in preparation for a smoothing session. When I started working, contact was not good. The lap didn't give that nice even drag you expect from good figuring. I stopped after just one circuit of the barrel and pressed for another hour. Once again, I was only able to make one trip around the barrel. The lap's contact was still not correct. I stopped for the evening. Temperatures have dropped into the middle to upper 60's (F) in the garage this week. I will need to re-channel the lap in order for it to behave softer given the lower working temperatures.
Monday, October 21, 2002
Today, I restarted work on the mirror after working on other hobby items for the past week. I re-channelled both laps this evening. The 4" is still in good shape. Its pitch remains about 0.2" thick. Re-channelling and trimming were accomplished without any problems. The 9.5" lap was also re-channelled. The pitch is quite thin now -- it is no more than 0.95" thick. I cut the channels all the way down to the plaster base and made the facets 3/4" wide. I hope this will allow the pitch to flow enough so that the lap will perform well. I may have to rebuild this lap before finishing the mirror. Cooler temperatures are working against the thinness of the lap now. After re-channelling, the 9.5" lap was pressed with window screen for an hour. The screen made a good impression on the surface, so I know the pitch is flowing well. After a normal cold press directly on the mirror, I will be ready to try a smoothing session with the larger lap.
Friday, October 25, 2002
I worked for 20 minutes today, still struggling with poor lap contact. The session started with an hour of cold pressing. During the 20 minute working time, I cold pressed for another 10 minutes. Lap contact is not good at all. It tends to want to grab at random times during the strokes. I tried using relatively long strokes with 2.5" of overhand at front and back and 1" of overhang at the sides. Working temperature in the garage was only about 63 degrees F. Figure 60 shows that the mirror has lost correction and the edge is once again turning more. This is probably caused by the hard-acting cold, thin pitch lap. The backward progress is discouraging.
Sunday, October 27, 2002

I worked for 30 minutes today using both the 4" and 9.5" laps. I started with the 4" lap and short radial strokes centered about 1" in from the edge of the mirror. The lap was allowed to overhang the mirror's edge by about 1.5 inches. Following 10 minutes of that treatment, I cold pressed for 10 minutes and then did 20 minutes of work with the larger lap. Contact remains very poor. I was hoping that the lap would "break in" during the session, but its action did not improve. It continued to grab and skip across the mirror during work. I finally stopped not wanting to cause too much damage to the deteriorating figure on the glass. Figure 61 shows the damage that was done. The action of the small lap is evident as expected. The use of the larger lap did not accomplish the blending that was intended. The mirror is now looking much like it did several hours (of work time) back.
It has now become clear that I must rebuild the lap before continuing. It is much too thin and hard. Now that temperatures have dropped as we head into the Winter months, the lap is acting much harder. This lap was a little too soft when I was working at 90 to 95 degree temperatures and now that it is in the 55 to 60 degree range in my garage workshop most days, the lap is much too hard. Winter temperatures vary considerably here in central Texas. I will need to delay any further serious figuring work on this mirror until the temperatures are more stable and predictable.
Work Resumes Following The Cold Weather Break...
Sunday, March 9, 2003
The weather here has started to warm up into the range of 65°F to 75°F every few days. It is now time to get back to work on finishing this mirror. Today, I stripped the pitch off the 9.5" lap. I placed the lap into an air-tight plastic bag and put it in the freezer for about six hours. The pitch became very hard and brittle. I removed the lap from the freezer but left it in the sealed bag.
I used a rubber mallet and a small flat wooden paint stirring tool to knock most of the pitch off the plaster base while still in the bag. I then removed the base from the plastic bag and chiseled the remainder of the pitch off the tool base. I was a little more aggressive than I should have been and scraped several holes in the epoxy coating on the plaster. I decided to strip the remainder of the epoxy off the top of the lap base and then cover it with fresh epoxy. Some of the epoxy could be peeled off the plaster (taking a thin layer of plaster with it) while the rest had to be scraped off. After removing all the epoxy, I warmed the tool in the clothes dryer for about 45 minutes. While still slightly warm, I applied a new coating of epoxy and left it to cure.
The pitch removed from the lap was added back to my pitch container. I keep my recycled pitch in a quart sized metal paint can. I began slowly heating the pitch to blend it with the previous pitch stored in the can. After the pitch was thoroughly melted, I checked a small sample for hardness. Surprisingly, it was about right in spite of having a high proportion of recycled pitch in the mix. It also looked clean enough not to worry about filtering the recycled pitch at this time. I will pour the new lap tomorrow.
Monday, March 10, 2003
This evening, I poured the new 9.5" lap. I started the pitch melting over a very low heat and started preparing the mirror. I placed a thin, wet paper towel on the surface of the mirror and covered it with a sheet of aluminum foil. I carefully smoothed the foil and removed all wrinkles. I placed the epoxy coated plaster lap base on the foil and drew an outline around the tool to guide me in placing the dam onto the mirror. A strip of plastic 1/4" wide made up the dam for the pitch. This was attached to the foil on the mirror using a dozen small pieces of tape around the periphery. The foil and interior side of the dam were painted with Cerium Oxide polishing slurry which served as a release agent.
After the pitch was heated to a point of being very thin and liquid, I removed it from the heat and began to stir it. I stirred constantly until it had thickened considerably. The stirring allows me to keep the pitch at a constant temperature throughout as it cools and thickens. After reaching a consistency of thick cake batter, the pitch was poured into the dam on the mirror's face. The plaster base was then set into the pitch and pressed gently so that the pitch would just start to overflow the edge. That ensured the pitch was in good contact all the way out to the edge of the plaster base.
I allowed the pitch to cool on the mirror for about 10 minutes. I then slid the lap off the mirror by tugging on the foil at the edge of the mirror. The lap (with dam and foil still attached) was then run under cold water to complete the hardening. I stripped off the foil and dam revealing a nice lap just a little over 1/4" thick having the curvature of the mirror. After scrubbing the lap clean under running water, I set it aside in preparation for channelling. I was interrupted and did not have time to channel the lap this evening.
Tuesday, March 11, 2003
I finished the lap by channelling and pressing this evening. I made the facets 1/2" wide with 1/4" wide channels. It took about 25 minutes to cut the channels. I pressed the fresh lap with window screen and 10 pounds of weight for 30 minutes. I will not be able to start figuring with the lap until tomorrow, so I decided to let the lap continue to press with the window screen overnight. I did not use any weight other than the weight of the lap itself. I wet down the mirror very well, placed the window screen and lap onto it, and wrapped the area around the lap with wet paper towels to help prevent drying. The lap should be ready to go tomorrow. I will only need to do a normal 30 minute weighted cold press without the window screen before I start figuring.
Thursday, March 13, 2003


I didn't have the time or energy to do any figuring yesterday. I started work today with a 20 minute figuring session. I had left the lap on the mirror overnight without any window screen. Contact between the lap and mirror was perfect. It was very nice to once again feel that smooth constant resistance during each stroke. The lap was making a very loud squeaking noise throughout the session. The previous 9.5" lap had not done that in a long time. The temperature in the garage workshop was 71°F during the work session. Figure 62 at left shows that the channels have only closed slightly and the pattern of the window screen is still prominent on the lap. The hardness seems just about right given the current temperatures.
The 20 minutes figuring session started with a chordal stroke. The strokes were relatively long and kept the inner edge of the lap moving along a diameter of the mirror. The outer edge of the lap extended two to three inches over the edge of the mirror throughout the stroke. This stroke was used for six trips around the barrel. This was about 8 minutes of figuring. Since I expected this to both work the edge and outer zones somewhat, I also expected it to dig a hole in the center of the mirror. To blend this chordal stroke's action, I followed it up with 12 minutes of very slow, long, wide W strokes. Front to back overhang was about 3.5 inches with a side to side overhang of 2.5 inches for each stroke. Figure 63 shows the mirror at the end of this session. The mirror still looks much like it did after the previous session last Fall. There may be a very slight improvement in the rolled edge and the zones just outside the center may be a little worse. There is indeed a small hole in the center which I expected to find following the chordal strokes. I will do an extended session using the very long, wide W strokes to see if the edge continues to improve and the overall figure blends together better.


I cold pressed for 30 minutes with about 5 pounds of weight prior to starting this figuring session. The figuring session lasted for 40 minutes with only three breaks of about one minute each for adding water and Cerium Oxide. Only W strokes were used. They allowed an overhang of about 3.5" front to back and about 2.5" side to side. It took 10 to 12 strokes for each zigzag across the mirror. Approximately fifteen steps were required per circuit of the barrel. A total of 12 circuits of the barrel were completed during the session. Figure 64 shows the mirror following this session. The overall shape has improved and smoothed out. The rolled edge has improved very slightly. It will take a few more sessions like this one to appreciably improve the edge.
After cold pressing for an hour with about 5 pounds of weight, I started another session. The lap did not feel like it was making good contact. After struggling with the strokes for about 5 minutes, I gave up and went back to pressing. This time, I pressed for 30 minutes with the window screen. I then started right back into figuring. Lap contact was very good now. I figured for 30 minutes this time. The first 20 minutes of figuring was accompanied by very loud screeching noises. Very long, wide W strokes were used for the whole session. Figure 65 shows the mirror following this work. The mirror is looking much better now. The central zones are smoothing out and correction is finally being added back. The edge has improved some more but still needs considerable work. I plan to continue this mode of figuring and see how the mirror responds.
Friday, March 14, 2003
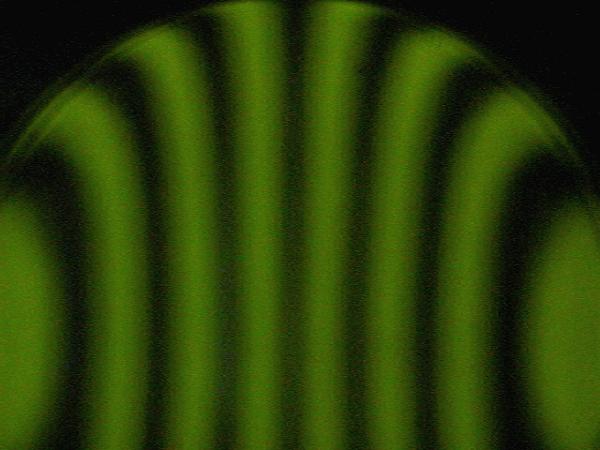
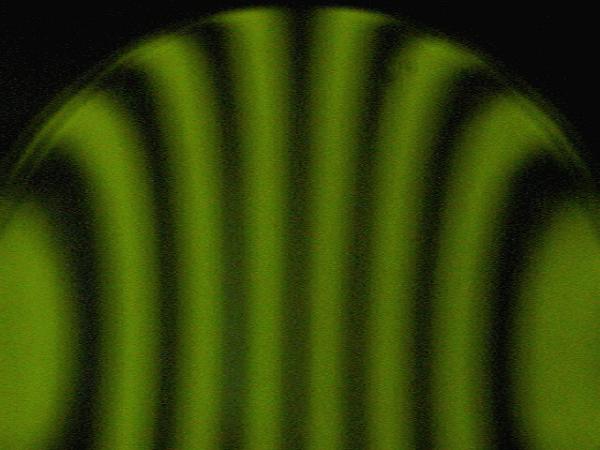
The lap was pressed with window screen and 10 pounds of weight for 30 minutes prior to this figuring session. Following that cold pressing, the lap was pressed without the window screen for a few minutes before starting work. Lap contact was again very good. Most of the 30 minute long session was accompanied by the same loud screeching noise as before. Again, as in the previous sessions, the strokes used were very long and very wide W strokes. Front to back overhang was about 3.5" and side to side overhang was about 3". Figure 66 shows the results. Overall correction has increased only very slightly. The rolled edge appears to have been pushed farther out by perhaps 1/4". The surface curves are once again looking smooth with little evidence of the shallow zones seen when I started back to work on the mirror. I think still more of these long, wide strokes are called for.
Another 45 minute figuring session was done. It was preceded by a 30 minute cold press cycle with window screen and 10 pounds of weight. The screen was removed and the lap pressed for another 5 minutes before starting work. Lap contact was very good with the first 15 minutes of work producing the loud screeching noise. The strokes used were the same as the previous session. Figure 67 shows that progress continues to be slowly made. Correction is still being added and the rolled edge is moving outward very slowly. The surface continues to remain smooth as can be seen by the evenly flowing widths of the lines in the Ronchi image. Since this treatment with very long, wide strokes continues to help the overall figure, I will continue using it.


This session started with 45 minutes of cold pressing with the window screen and 10 pounds of weight again. A couple of minutes pressing without the screen were done while the work area was prepared. Lap contact continues to be very good. The same wide, long W strokes were used for the entire figuring session. Figure 68 shows the mirror after the 45 minutes of working time. A very slight amount of correction was added and the rolled edge continues to improve. The mirror now looks much like it did back on September 28. The edge may be just a bit better and the overall correction is slightly higher, so I have finally recovered the ground I lost when the weather turned cooler and the lap became much too hard. I think another couple of hours with these long strokes may finally cure the rolled edge.
A long one hour figuring session was performed. The lap was cold pressed with window screen and 15 pounds of weight for an hour before the work session. Only a few minutes pressing without the screen were allowed. Contact continued to be very good. Again, long, wide W strokes were used throughout the session. Figure 69 shows the results. The rolled edge is nearly under control now. Only the outer 1/8" to 1/4" show the effects now. It doesn't look like any additional correction was added during this session. During the next session, I will try to add some more correction by narrowing the strokes slightly to concentrate a little more work towards the center. I will keep the strokes long so that the edge doesn't fall too far behind during the added center work.
Saturday, March 15, 2003
After thinking about the problems I had last Fall in adding correction to the mirror and talking it over with an ATM friend, I have decided to make another lap to use as I parabolize the mirror's figure. I have decided to make a 7" lap. The 4" lap I have is too small to give a very smooth figure. I may still use it to treat any zones that develop. The 9.5 lap seems a bit too large to force the amount of correction I need. Therefore, it seems a 50% lap may help. I poured a 7" plaster base for the lap this evening. I cast it against the mirror as usual. I let it wet cure for four hours and then left it to air dry overnight.
Sunday, March 16, 2003
I finished drying the base for the 7" lap on the shoe rack in the clothes dryer and then coated the plaster with epoxy.
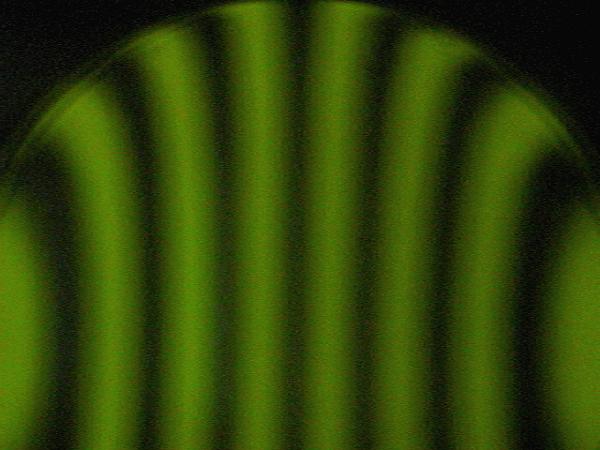
I continued figuring with the 9.5" lap while waiting for the epoxy on the new plaster base to cure. I did a very long cold press cycle of several hours with window screen and 10 pounds of weight. This was followed by a quick 5 minute pressing without the screen material. A 45 minute figuring session was performed. During the session, long W strokes were used. Overhang at the front and back of each stroke was about 3.5", while side to side overhang was reduced to about 1" to 1.5". Lap contact was excellent with squeaking noises being heard for over 30 minutes of the session. The lap's facets are now touching, so I will need to re-channel it to maintain good contact in future sessions with this lap.
Figures 70 and 71 above show the mirror following this session. The edge continues to look pretty good but little if any correction has been added to the figure. I almost expected that given my previous experiences with the 9.5" lap. The Foucault image shows that the mirror's figure is beautifully smooth with no visible roughness or dog biscuit. Surprisingly, while taking the Foucault images, I noticed that the diffraction ring has finally made an appearance all the way around the mirror. At about 15mm outside of the radius of curvature, the edge of the mirror shows a complete diffraction edge at full cutoff of the knife edge. The ring is not equal brightness all the way around but it is finally visible. I didn't expect to see this since there is still some rolled edge present and I have not eliminated the 1/32" wide severely turned edge.
Monday, March 17, 2003

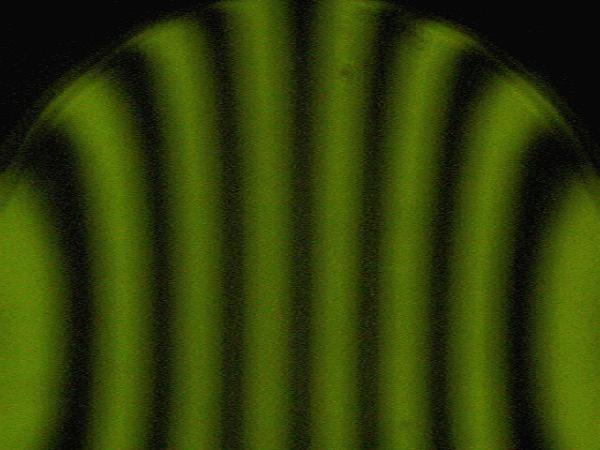
This evening, I mixed up a new batch of pitch, tempered it, and poured the new 7" lap. I then channelled the lap and cut a bevel at the edge. Figure 72 shows the fresh lap before I did the first cold press cycle. I pressed the lap with window screen for 45 minutes using 10 pounds of weight. I then pressed without the screen for 10 minutes. A short figuring session was done next to break in the freshly prepared lap. I figured for 20 minutes using slow strokes. Because of the smaller lap diameter, I used W strokes with about 2.5" of front and back overhang and about 1" of side to side overhang. The lap contact was pretty good and should improve with additional pressing. The usual squeaking noises were heard only occasionally during the session. Figure 73 shows the mirror following the short session. No damage was done with the new lap and there was perhaps a small amount of correction added though the session was too short to tell for sure. When I do my next full session with this lap, I will start doing some preferential polishing by doing more strokes across the center of the mirror to work those zones more.
Wednesday, March 19, 2003
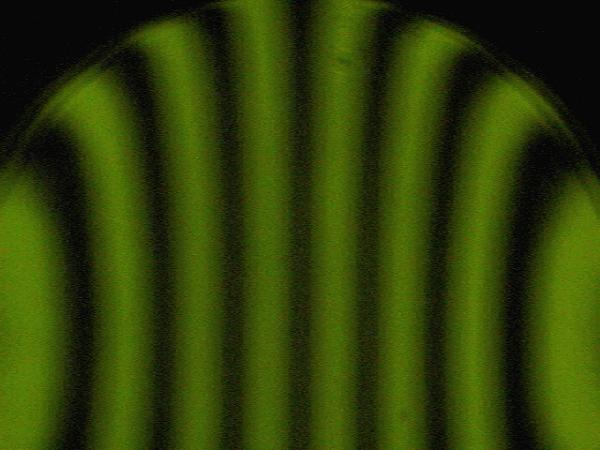
I tried a figuring session with a slight concentration on the center of the mirror using the 7" lap. I cold pressed for 30 minutes with window screen and 10 pounds of weight. I started the session but stopped after only 5 minutes. The lap contact didn't feel right. I cold pressed for another hour with window screen and the weight followed by a plain pressing cycle without the screen for 5 minutes. I restarted the figuring session. Lap contact wasn't great -- only acceptable. I am not sure why. I figured for 15 minutes using a W stroke. The overhang at front and back was about 2.5" and side to side overhang was about 1". To give the mirror extra action towards the center, I modified my normal W stroke a little. Starting at one side of the mirror, I zigzaged across the center to about the 70% zone and then switched directions. When the lap reached the 70% zone on the side I started from, I switched directions again and continued on to an overhang at the other side of the mirror. The last two circuits of the barrel used normal W strokes to help blend any irregularities.
Figure 74 shows the mirror following this session. The surface is still smooth with no zones developing. The edge still looks okay. A tiny amount of correction appears to have been added to the overall figure. This stroke seems okay to try for a longer session. I will probably work the next longer session by alternating between about 10 minutes with the center-preference stroke and then 5 minutes with a more normal blending W stroke to try to keep the mirror zone free.
Thursday, March 20, 2003
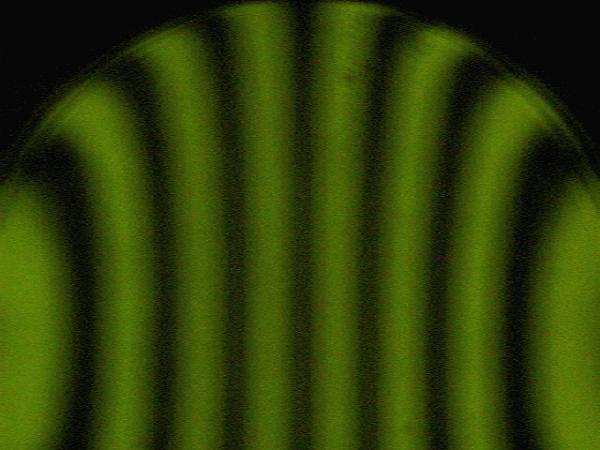
Today's figuring session with the 7" lap began with a 90 minute cold pressing with the window screen and 10 pounds of weight. The lap was then pressed for a few minutes without the screen. I decided against using the same strokes as yesterday since they took a relatively long time for each circuit of the barrel. I was concerned about incomplete blending and possible astigmatism creeping into the figure. I used two types of W strokes instead. Both had a front to back overhang of about 2". They differed in their side to side motion. The stroke used to work the center consisted of W strokes in which the edge of the lap was never allowed to approach the edge of the mirror closer than about 1.5". The other W stroke worked across the mirror to an overhang of about 1.5" on each side. For each two circuits of the barrel using the center-acting stroke, one circuit using the normal blending stroke was done. This routine was done for the 30 minutes of figuring time. Figure 75 shows the mirror after the session. The amount of correction added to the figure was much less than expected. It appears that the correction is up to about 50% now. I will continue this routine and use some longer sessions.
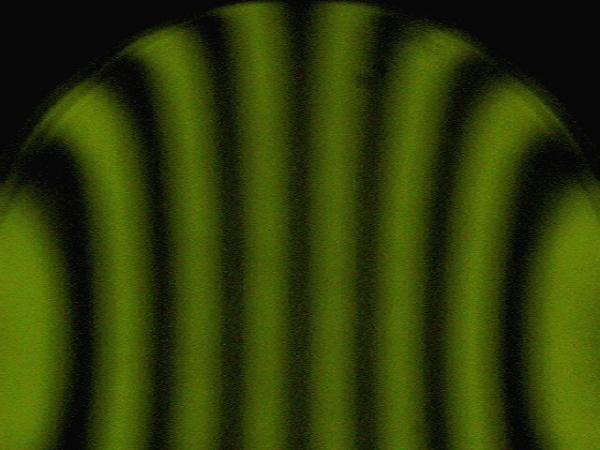
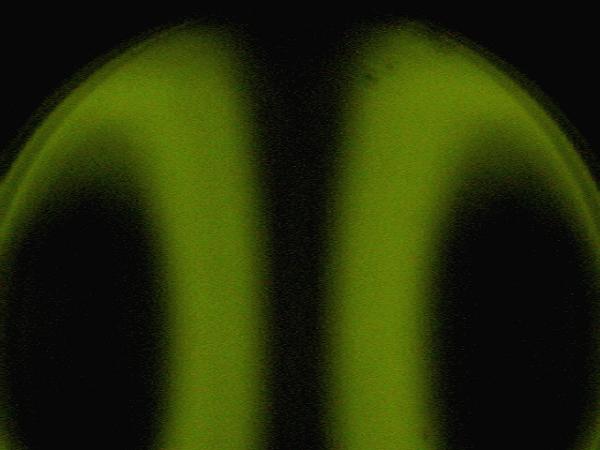
A second figuring session was performed using the 7" lap. It was preceded with 30 minutes of cold pressing on the window screen and 5 minutes without. The figuring session was 45 minutes long. The strokes used were the same as earlier this evening. The only difference was that I used the center-acting strokes in a 3 to 1 ratio with the normal strokes rather the 2 to 1 ratio used earlier. Lap contact was acceptable but not great. To counteract the tendency of the lap to slip occasionally, I slowed down the rate of the strokes. Figures 76 and 77 show the results of the session. The second Ronchi image was taken slightly closer to the mirror's center of curvature. It shows that the very edge is rolling slightly but is not out of control yet. I will continue to watch the edge so that it doesn't fall too far behind the other zones. It does appear that some additional correction has been added overall. After another session, I will run a set of Foucault measurements to see exactly how much.
Friday, March 21, 2003

A 40 minute figuring session was done this evening. I had left the 7" lap pressing with window screen and about 3 pounds of weight all day. The lap was then pressed without the window screen for 45 minutes. When I started figuring, the lap contact was better than it had been the past few days. During the 40 minutes of figuring, I alternated between the center-acting W strokes and blending W strokes in a 4 to 1 ratio. After several iterations of this, I finished with two circuits of the barrel using only the blending W strokes. Figure 78 shows the results of the session. I cannot see any additional correction in the figure except at the extreme edge. I think I will have to shorten the strokes to add more correction. I ran a quick set of Foucault images and reduced knife edge positional data from them. Results of the measurements showed a best fit conic constant of -0.596. I can use that as a baseline to see if progress is being made in future figuring sessions.
Saturday, March 22, 2003
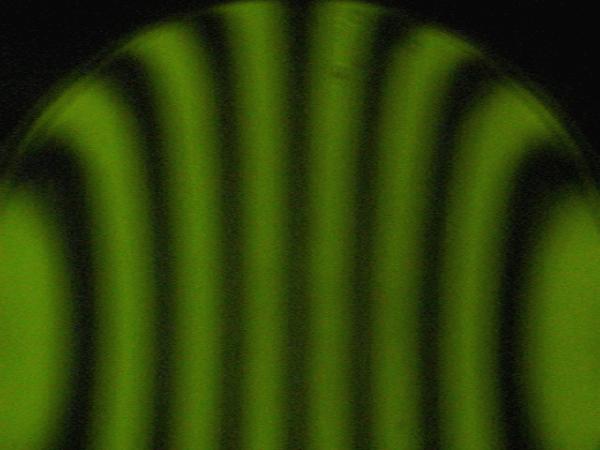
The 7" lap was pressed on window screen overnight with 3 pounds of weight. It was then pressed without the window screen for 45 minutes before starting the figuring session. I have extended the pressing cycles because the temperatures are once again in the lower 60°F range in my garage causing the lap to act harder. A 45 minute figuring session was done. I narrowed and shortened the center strokes. Front to back overhang was shortened to about 1". On the side to side motion, the lap was worked out to about 1" short of the mirror's the edge. These strokes were combined with the very long, wide W strokes in a 4 to 1 ratio. Three iterations of this series were done and then I finished with an extra circuit of the wide blending strokes. Figure 79 shows the mirror following this work. Changes are hard to see but I think a little more correction has been added to the mid and outer zones. I will try another session like this one to see if any changes become more obvious. At this rate, it will take at least five or more hours of work to get close to the required figure.

After cold pressing the 7" lap for 6 hours without window screen, I did a 45 minute figuring session. The center strokes were narrowed so that they didn't approach the edge of the mirror by less than 2". Front to back overhang remained at about 1". These strokes were used along with normal W blending strokes in a 4 to 1 ratio. The session ended with an extra circuit of the barrel using the blending stroke. Figure 80 shows the mirror at this point. Little correction was added. The edge is beginning to look more rolled once again. A set of Foucault images were taken and reduced to get an estimate of overall correction. The results showed that the mirror has an average best fit conic constant of -0.628. Some progress was made but things are moving very slowly. I may try to speed them up by using the 4" lap followed by the 7" to blend the zones that will probably result.
Sunday, March 23, 2003

Today's figuring session used the 4" lap followed by the 7" lap attempting to aggressively add correction to the mirror. The 4" lap was pressed with 3 pounds of weight overnight. The session used two forms of strokes with this lap. I alternated the two types of strokes during the session. The first stroke was a W stroke which worked on only the center 8" portion of the mirror. The second stroke was a W stroke during which edge of the lap was taken up to edge of the mirror both front to back and side to side. The two strokes were alternated with each circuit of the barrel. Five circuits using each stroke were performed. Following use of the 4" lap, the 7" lap was pressed with window screen for one hour with 20 pounds of weight. A regular cold pressing was then done for 15 minutes before starting figuring. Five very slow circuits of the barrel were then done using long, wide W strokes. Front to back overhang was about 2.5" and side to side overhang was about 1.5".
Figure 81 shows the mirror after this work session. Average correction seems to have been increased to roughly 80% with the edge showing full correction already. By the time I add more correction to the center, the edge will be quite rolled again. I think that is what I will attempt. Another session similar to this one will be done. If I overshoot the overall amount of correction I need, I can then use the 9.5" lap to work the edge back shorter. It will probably take a few attempts but this is the strategy I will try for finishing this mirror. I will run another set of Foucault images after the next session to see what the mirror's profile looks like. I will probably switch to rouge after this next session also.


I cold pressed the 4" lap on window screen for two hours before starting this figuring session. That was followed by 20 minutes of cold pressing without the screen before starting. I did 13 trips around the barrel. These were done in three repetitions of three circuits using short, narrow W strokes in the center 6" of the mirror followed by a circuit using edge to edge W strokes for blending. A final extra blending circuit was then done. Following this treatment, I cold pressed the 7" lap with window screen for an hour with 20 pounds of weight. A thirty minute normal cold pressing was then done before starting back to work.
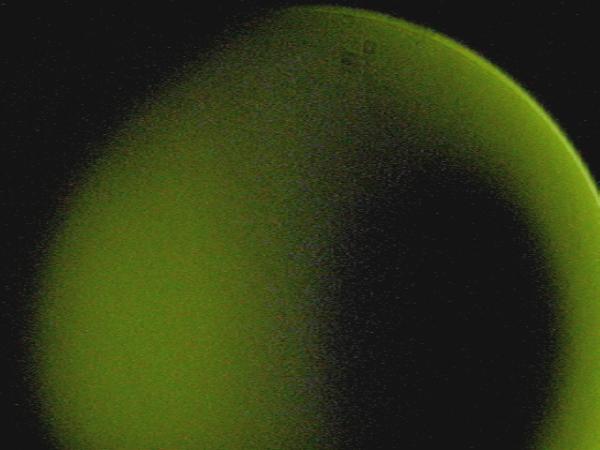
Six trips around the barrel were done with the 7" lap using long, wide W strokes for blending. Front to back overhang was about 2.5" and side to side overhang was between 2" and 2.5". Total work time with both laps was about 30 minutes. Figure 82 shows the state of the mirror following the session. Figure 83 above shows a ideal mirror's figure. The mirror looked pretty close to the target so I took a set of Foucault images to check overall correction. (Figure 84 shows one Foucault image which demonstrates the deep shadows present on an F4.4 mirror. The surface is still quite smooth in spite of using the 4" lap.) I was able to derive data for twelve zones from the images. When input into FigureXP (by Dave Rowe and James Lerch), the results showed a best fit conic constant of -0.925 -- the mirror is getting close. (The Strehl ratio is still just 0.678.) The edge is showing as turned in the outer 1/8". I will do another figuring session like this one using rouge. In addition, I think I will use the 9.5" lap for the final blending session since it has been more successful in helping the turned edge. I may need to overshoot the parabola by a little bit and then bring the figure backwards with the 9.5" to ensure a pretty good edge.
Tuesday, March 25, 2003
In preparation for switching to using rouge for the final figuring, I washed up the laps this evening. Usually, I would just start using rouge without any cleaning of the laps but I want a quick transition to the slower acting polishing agent so decided to remove the excess Cerium Oxide. I washed the 4", 7", and 9.5" laps under cold running water. I lightly scrubbed the laps with an old toothbrush to remove the built-up Cerium Oxide from the channels. Some Cerium Oxide remained embedded in the lap's surface but that won't affect things much. After washing the laps, I dried them and then painted them with rouge. One at a time, I cold pressed each on the mirror using window screen. The 4" was pressed for 30 minutes with 10 pounds of weight, the 7" for an hour and a half with 20 pounds of weight, and the 9.5" was left to press until tomorrow evening with 5 pounds of weight. I was most worried about contact with the 9.5" lap since I haven't used it for the past few sessions as the mirror's figure changed. When I start my next figuring session, I will cold press the laps again without the screen to ensure good contact. I plan to use only the 4" and 9.5" laps but prepared the 7" lap just in case I need it.
Thursday, March 27, 2003
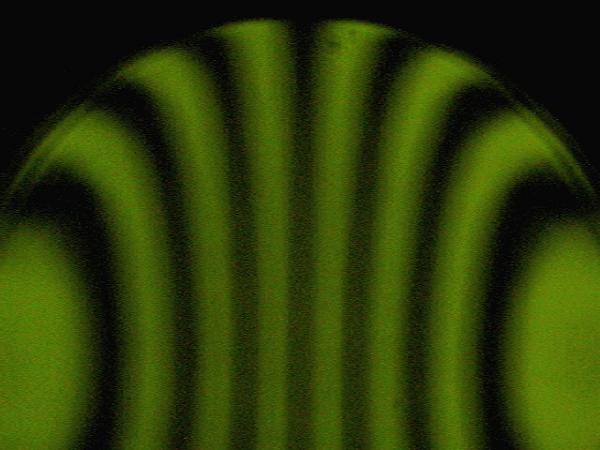
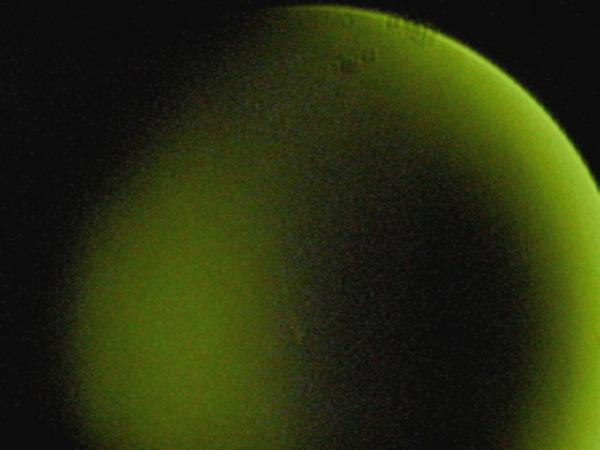
I did the first "final" figuring session with rouge this evening. The 9.5" lap had been pressing for two days with no weight. I cold pressed the 4" lap for 15 minutes with 10 pounds of weight before starting the session with it. I kept the session short so I could gage progress better with the rouge. I used little pressure on the lap as I worked. Using the 4" lap, I made two trips around the barrel using W strokes in the central 8" area of the mirror. These were followed by using W strokes which took the lap from edge to edge of the mirror. A second repetition of this was then done. I next pressed the 9.5" lap with 20 pounds of weight for 10 minutes. Six trips around the barrel were done with the larger lap. Strokes were long and wide W strokes. Front to back overhang was about 3.5" and side to side overhang was about 2.5" to 3". All of the strokes for this work session were very slow -- roughly 3 to 4 seconds for each stroke across of the mirror. Total actual figuring time was about 20 minutes. Figures 85 and 86 show the mirror. The turned edge looks a little worse than before but the figure shows little change. A set of Foucault images were taken and the zonal data reduced. The average best fit conic constant is now -0.935 showing a little more correction. The Strehl ratio increased slightly to 0.718. It looks like it is safe to do a slightly longer session now that I have a feel for how slowly the rouge is acting.
Friday, March 28, 2003
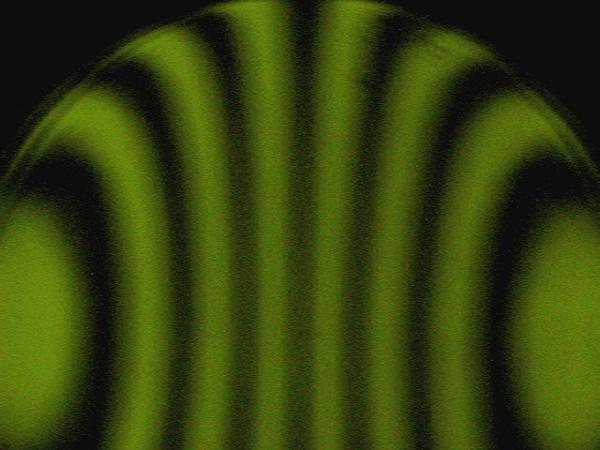
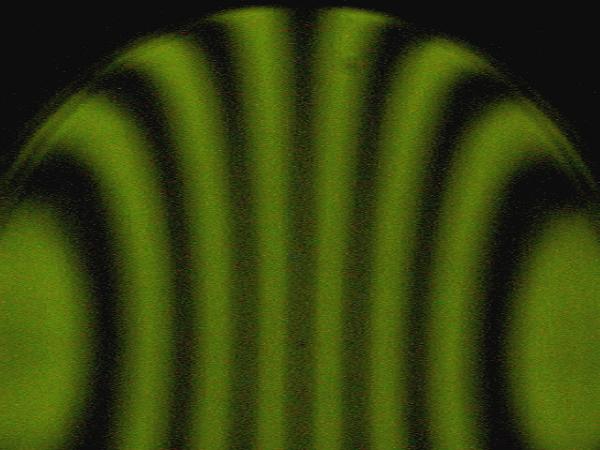
I did a figuring session using only the 9.5" lap. The lap had been pressing overnight. I used long, wide W strokes throughout the 20 minute session. During that time, I made 8 trips around the barrel. Front to back overhang was 3.5" and side to side overhang was 2.5". Contact was excellent with lots of screeching noises from the lap. Figure 87 shows the mirror following the session. The edge does not seem to have responded to the treatment. A set of Foucault images were made and showed that overall correction had been reduced to a -0.916 best fit conic constant. The Strehl ratio is down to 0.587.
The second figuring session this evening started with use of the 4" lap. I did three repetitions of W strokes in the sequence of one circuit concentrating on the central 6" of the mirror, followed by one circuit of strokes concentrating on the central 10", and finishing with one circuit of W strokes with 1/2" overhang all around. This treatment was followed with 6 circuits using the 9." lap. Long, wide W strokes were used. Front to back overhang was 3.5" and side to side overhang was 1.5". Figure 88 shows that the mirror has changed little following this 30 minute session. If anything the edge looks worse. A run of Foucault images showed that overall correction is came back up slightly to -0.925 with the Strehl ratio now at 0.594. The Foucault profile showed that the turned edge has become steeper and narrower. I think I will try this sequence again a few more times till I get a better feeling as to how the laps work with rouge. I think I should be a little more aggressive with both the center strokes and the Wide W strokes.
Saturday, April 05, 2003
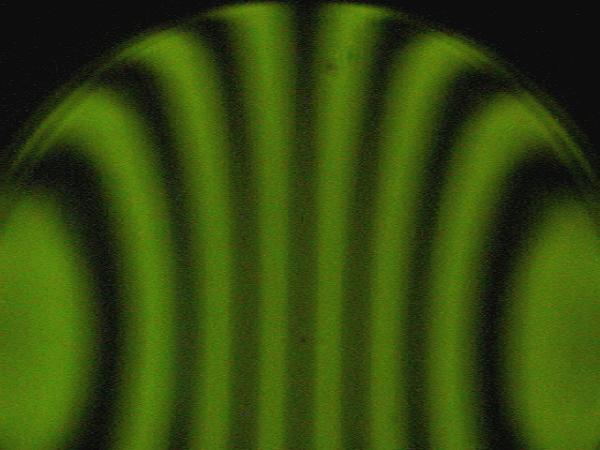

Today's 30 minute session used the 4" lap and the 9.5" lap in much the same way as the previous sessions. I first did three trips around the barrel using the 4" lap with W strokes in the central 8" area of the mirror. This was followed with one circuit of chordal strokes around the edge with about 1/4" of overhang. Finally, one trip around the barrel was done using edge to edge W strokes. Three repetitions of this sequence were done. I pressed the 9.5" lap for 20 minutes with 20 pounds of weight before using it. Lap contact was not very good but I continued anyway. Six trips around the barrel were completed using long W strokes. The strokes had about 3.5" of front to back overhang and 1" to 1.5" of side to side overhang. Figure 89 shows that the rolled edge has improved slightly while the extreme edge seems to have gotten a little worse. Correction has been lost but this was expected from the very long W strokes used. I think I need to try to get the edge under control before worrying about the amount of correction for now.
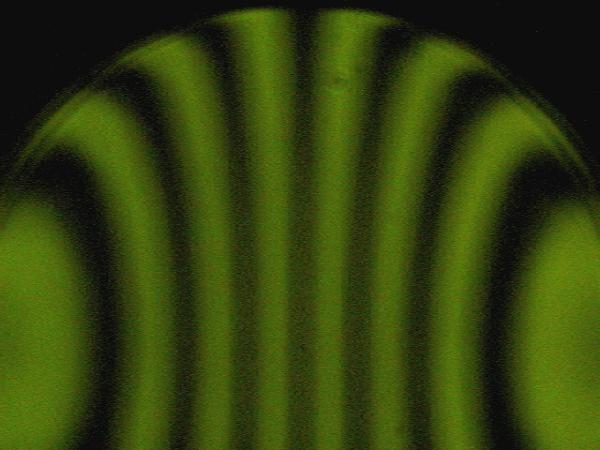
This figuring session used only the 9.5" lap and lasted for 20 minutes. I used very wide, very long W strokes throughout the session. Front to back overhang was 3.5" and side to side overhang was about 3". I did six circuits of the barrel. Figure 90 shows the mirror following this work. Again, more correction has been lost. The rolled edge looks a tiny bit better but there was little change at the extreme edge. The channels in the lap are closing up rapidly and contact is not what it should be. I will try a session with the 7" lap and will have to re-channel the 9.5" before another use.
A third figuring session was done. I used the 7" lap for 20 minutes of work. Long, wide W strokes were used the whole time. Front to back overhang was 2.5" to 3" while side to side overhang was about 2.5". Six trips around the barrel were made. Figure 91 shows that the edge has improved a little. I cannot see that much additional correction has been lost. I may try a couple more sessions with the 7" lap to see if things continue to improve. The lap is acting quite soft since temperatures were in the lower 80°F range today.
Sunday, April 06, 2003
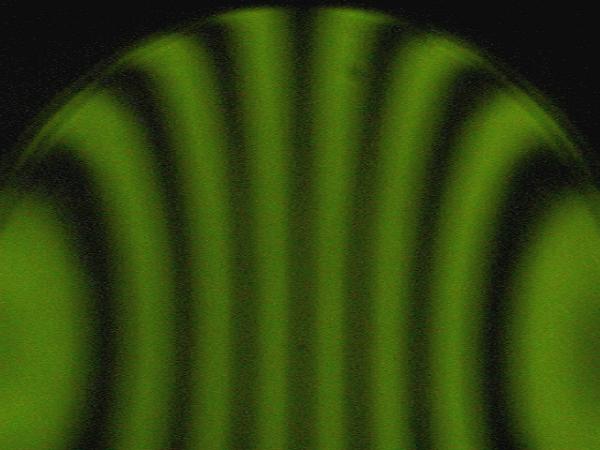
A 30 minute figuring session was done with the 7" lap using long, wide W strokes. The lap was pressed with window screen for 90 minutes and again without the screen for 10 minutes before starting. Contact was very good at first but became worse as the session progressed. Front to back overhang of the W strokes was 3" and side to side overhang was 2.5". Ten circuits of the barrel were completed in the 30 minutes of work time. I did a 5 minute cold press in the middle of the session to try to keep the lap in good contact. The temperature today in the garage was about 82°F. Figure 92 at left shows the mirror at this point. I can see no significant change from the previous session. I will try another session like this to see if anything is slowly happening.
Monday, April 07, 2003
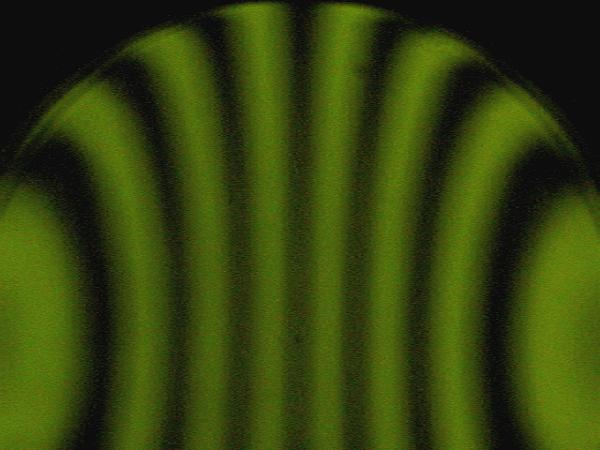
I was able to get one figuring session done this evening. I had cold pressed the 7" lap on window screen with just the lap's weight all day. It was relatively warm today with temperatures in my garage at about 82°F. When I removed the window screen from the lap, tiny pieces of pitch were pulled up. The damage to the lap didn't look too bad so I brushed off the loose pitch flakes, painted the lap with rouge, and cold pressed for an hour with 10 pounds of weight before starting the figuring session. The channels in the 7" lap are now closing up rapidly also. I may be able to get one or two more sessions before it requires re-channelling.
The figuring session lasted for 30 minutes, though work time was about 45 minutes. Lap contact was very good with screeching noises heard occasionally throughout the session. I used very long, wide W strokes exclusively. Front to back overhang was 3" while side to side overhang was between 2.5" and 3". I stopped to cold press for two minutes after every two trips around the barrel. A total of 10 circuits were made. Figures 93 and 94 show the mirror following this work. The correction is about the same as before and the edge doesn't seem to have improved any more. I can see slow progress on the extreme edge by comparing the latest Ronchi image to those from Saturday (Figures 89 - 91). I took a set of Foucault images to see what the mirror's curve looked like. The results showed an average best fit conic constant of -0.880, a P-V wavefront of 1/2.25, and a Strehl ratio of 0.432. The edge (on the glass) is showing high at about 120 nanometers, the center high at 110 nanometers, and the low on the glass is at the 75% zone. The extreme edge does show the change of slope seen in the Ronchi images. Based on these measurements, I will try working the center down again and blending the whole curve. Hopefully, the extreme edge will stay close to where it is.
Wednesday, April 09, 2003
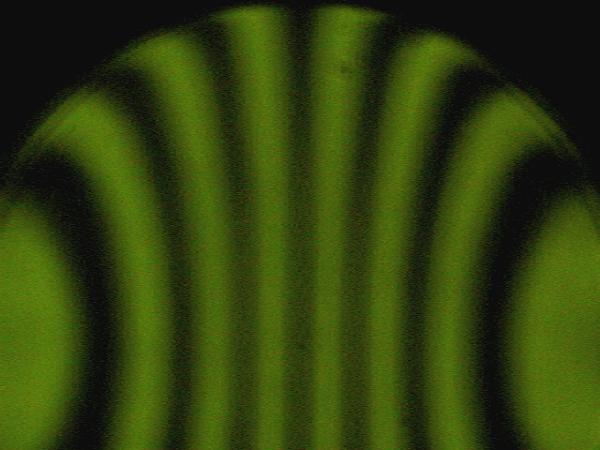
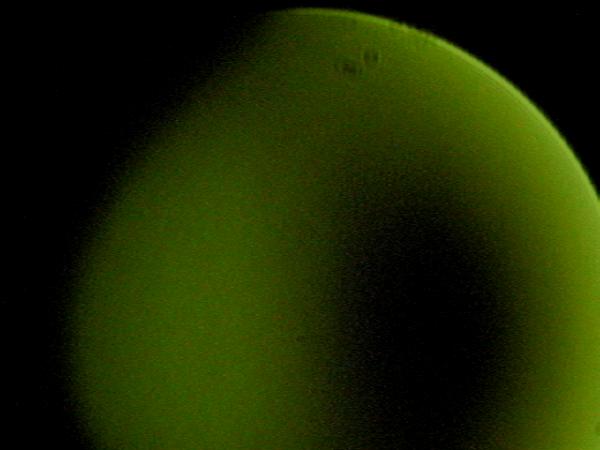
A 30 minute long figuring session was completed this evening. After the normal cold pressing of the laps, I started by using the 4" lap to work on the center zones. I completed 10 trips around the barrel. I varied the strokes used with each circuit. All strokes were W strokes. Some concentrated on the center 6" of the mirror, others were concentrated in the center 8" while the remainder were kept in the central 10" of the mirror. After this treatment with the 4" lap, the 7" lap was cold pressed for 5 minutes and used with wide W strokes. Side to side overhang was about 2.5" to 3" and front to back overhang was limited to about 1.5". Six trips around the barrel were completed with the 7" lap pausing to cold press for two minutes after every other circuit. Lap contact was quite good with the usual screeching noises heard for much of the session. I observed an interesting phenomenon during this session. The screeching noises occurred most often as the lap passed over the 60% zone of the mirror during the W strokes. This seems to be telling me that the 7" lap is on the borderline of being too large to properly follow the deep, nearly parabolic curve of this mirror.
Figures 95 and 96 show the mirror following this work. The surface is still smooth and the extreme turned edge is about the same. Overall correction has increased. Data reduction of the Foucault image series now shows a best fit conic constant of -0.917, a P-V wavefront error of 1/3.21, and a Strehl ratio of 0.685. The edge shows the outer 0.2" as rolled. The edge peaks at about 75 nanometers high (with a 7 nanometer fall-off at the extreme edge), the center is 85 nanometers high and the low zone has moved inward to about the 72% radius point.
Thursday, April 10, 2003


A 25 minute figuring session was completed today. After cold pressing both laps, the 4" lap was used in the same manner as yesterday. Nine circuits around the barrel were made using W strokes over the center 6" to 10" area of the mirror. One extra trip around the barrel was done using very short (1" long) chordal strokes around the edge of the mirror with 1/4" of overhang. The 7" lap was then pressed again and used with very long, wide W strokes. Front to back and side to side overhang were both about 2.5" to 3". Only 5 trips around the barrel were done with the larger lap. Contact was good.
Figures 97 and 98 show the mirror at this point. Little change is visible in the Ronchi image. A set of Foucault images were taken and the zonal data reduced. The average best fit conic constant is now -0.937, the P-V wavefront is at 1/4.1, and the Strehl ratio has increased to 0.785. The edge is now showing as 67 nanometers high (at the 96% zone) with a drop off at the extreme edge to 55 nanometers, the center is 61 nanometers high, and the low zone is at the 80% radius point. Although I do not see much indication of zones in the images of the mirror, the Foucault surface profile (done over 12 zones) shows that the central high area is stair-stepped in shape. This obviously comes from using the 4" lap with W strokes in the center. (I had worked like before with 6", 8", and 10" W stroke areas.) It would seem that I need to do more than 5 slow circuits of the barrel with the 7" lap next time to ensure better blending action.
Friday, April 11, 2003
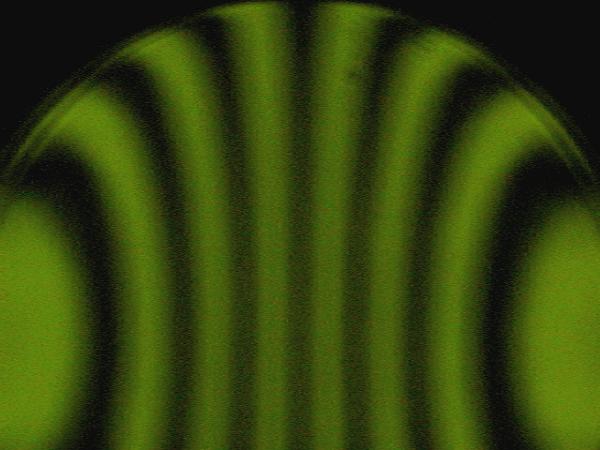
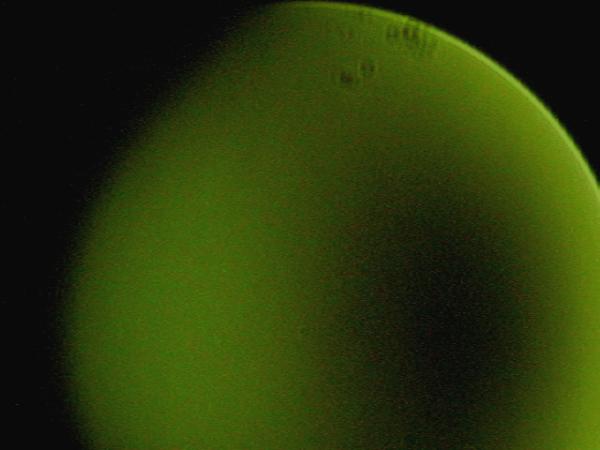
I completed a 35 minute figuring session this afternoon. Following the usual cold pressing routine, I did 6 slow trips around the barrel using the 4" lap. While W strokes were used, I changed the way I did them to try to eliminate the stair-stepped shape I observed before. All the W strokes with the small lap were about 10" long front to back but limited to only 6" wide. I thought this would work the center zones but provide more blending in that area. It seemed to work. That work was followed with 8 trips around the barrel using W strokes with the 7" lap. I also modified these strokes to see if I could affect the rolled and turned edge. The W strokes had a front to back overhang limited to 1.5" to 2" and a side to side motion with no overhang that took the edge of the lap only up to 1/8" from the edge of the mirror.
Figures 99 and 100 show the mirror following this session. The curve is still quite smooth but little change can be seen. Foucault measurements show that the session took me the wrong direction. Overall correction has dropped with an average best fit conic constant of -0.929 now. The P-V wavefront has dropped to 1/3.04 and the Strehl ratio has dropped to 0.681. The center is now high by 90 nanometers, the outer area (at the 95% zone) is 70 nanometers high falling off by 50 nanometers to the edge, and the low zone has broadened and moved inward back to the 70% zone.
Saturday, April 12, 2003
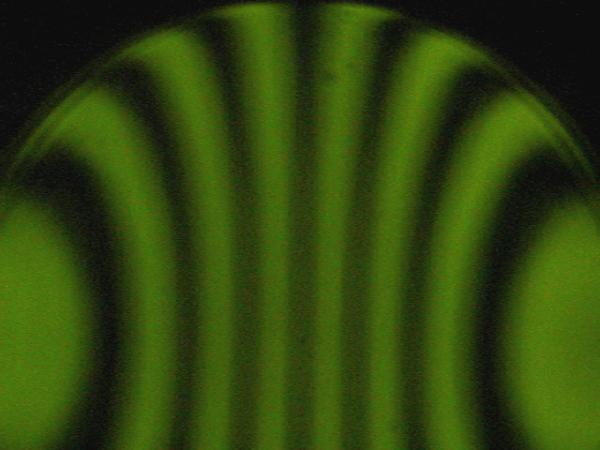
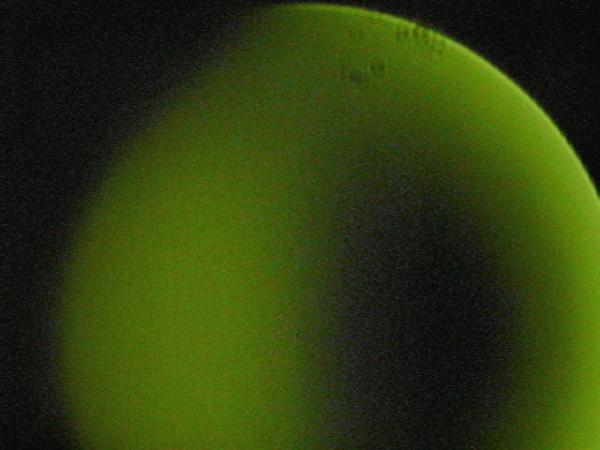
I had pressed the 4" lap on window screen overnight. I pressed the lap without the screen for 30 minutes before starting the figuring session. I worked 12 circuits around the barrel using W strokes that were about 9" long with about 5" of side to side motion. I wanted to take the center down by a bit more than in previous sessions. I pressed the 7" lap for 20 minutes before starting to use it. I made 6 total trips around the barrel using long, wide strokes. Both front to back and side to side overhang was 3". I stopped to press the lap for a minute or two after each circuit. I also rotated the mirror on the stand after every other circuit. Actual figuring time was 40 minutes, though work time was nearly an hour and a half.
Figures 101 and 102 show that mirror is still quite smooth. The extreme edge is still showing the narrow steep slope. Analysis of the Foucault images over 12 zones now shows an average best fit conic constant of -1.027, a P-V wavefront error of 1/4.75, and a Strehl ratio of 0.919. The mirror is now slightly over-corrected with a low center and a high of 57 nanometers at the 60% zone. The edge shows a fall-off of 30 nanometers from the 94% zone. I seem to have gone a bit too far with the center figuring. I could stop now but want to continue to work on the edge a bit more. I will do a couple more trips around the barrel using the 7" lap with the long, wide strokes to see if I can take out some the over-correction and lower the 60% to 70% zones. Hopefully, that will also make the edge look a little better.
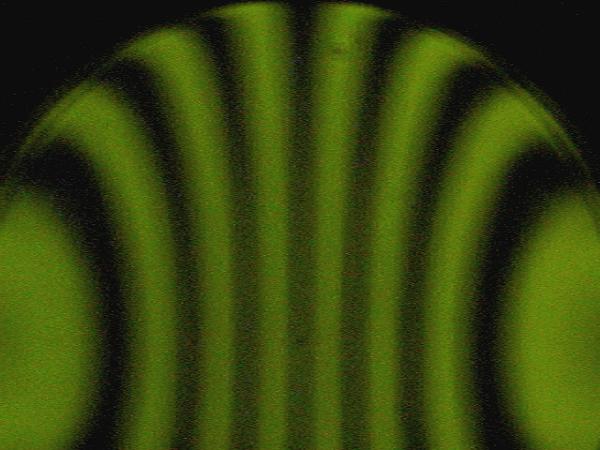
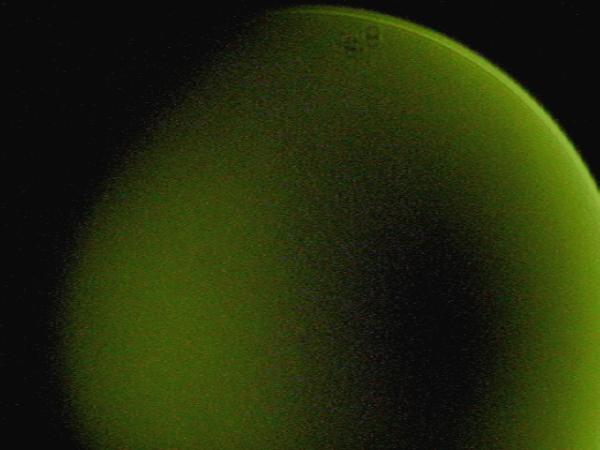
After cold pressing the 7" lap, I did 3 trips around the barrel using long, wide W strokes with an overhang of 3" in both directions. Figures 103 and 104 show the mirror after this short session. Amazingly for this short 10 minute session, the Foucault data show I went way too far in under-correcting the mirror. The best fit conic constant is now back down to -0.938, the P-V wavefront is at 1/3.69, and the Strehl ratio is back down to 0.786. The 70% zone is now the low point on the mirror with a central high of 71 nanometers and an outer zone high of 58 nanometers. The fall-off at the extreme edge is down to about 10 nanometers. I will go back to a short session of center work with the 4" lap followed by a couple of rounds with wide strokes using the 7" lap.
Sunday, April 13, 2003
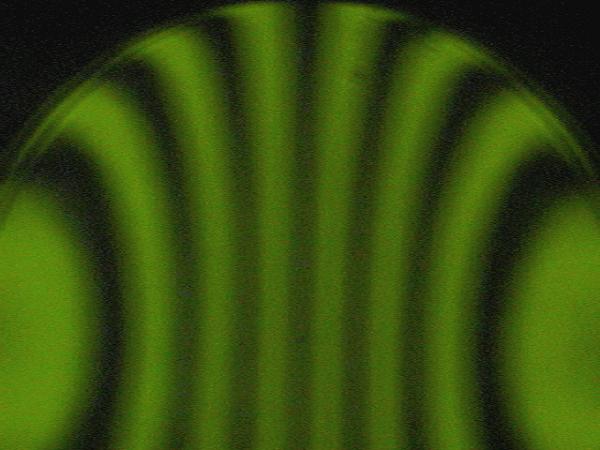
I did a short figuring session using both laps today. Three trips around the barrel with with the 4" lap using slow W strokes 9" long and 6" wide. This was followed with one very slow circuit with the 7" lap using W strokes having an overhang of 3" in all directions. Figuring time was 10 minutes. I used very little rouge. The mixture was extremely thin. Figure 105 shows the mirror. As expected, no changes are visible with such a short session. The Foucault measurements were puzzling. I took two sets of measurement images which did not show any correlation. One also showed much more change than should be expected from a short session. I also suspect something amiss with the results of the last figuring session from yesterday since it also showed a large change with little work. I will take another set of readings to see if I can find some error in my test methods. In addition, I will have a friend test the mirror using the Gaviola Caustic test to help sort out my recent differing test results. I will postpone further figuring work on the mirror until I know exactly where the actual figure lies.
Friday, April 18, 2003
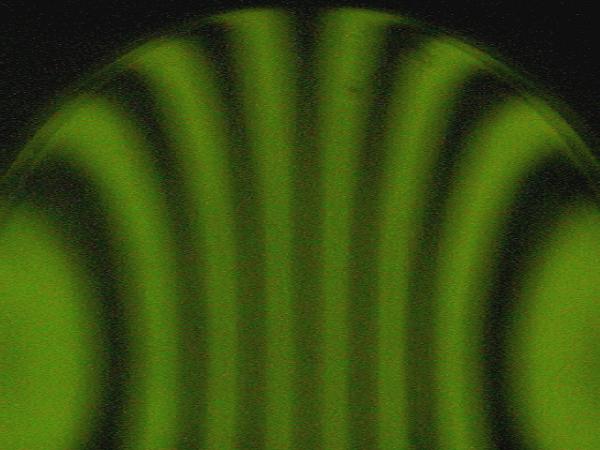

After looking back at my test results, I think I have found the problem. A subsequent test agreed with the retest of the mirror as being over-corrected by about 6%. I somehow mixed up the first image set I reduced for Foucault data resulting in nonsense test results. The previous ambiguous results were found to be caused by excessive source to knife edge distance on my tester. (I had installed the knife edge fixture backwards.) The processed images showed broad, ill-defined zones that were hard to measure. Having noted the causes, I will watch for these to crop up again and try to prevent them.
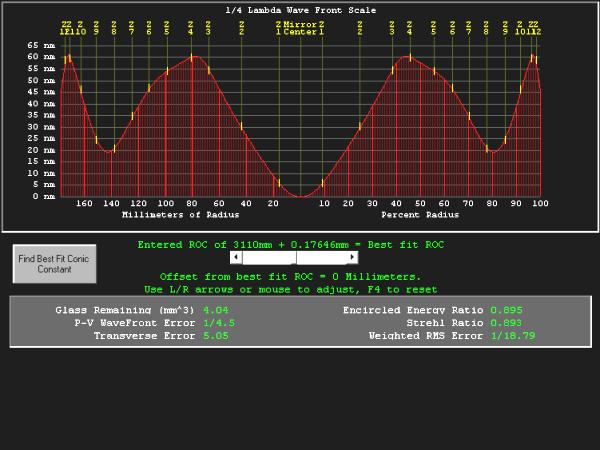
I had cold pressed the 7" lap overnight with window screen and then pressed again today for 1 hour without it. I made three trips around the barrel using long, wide W strokes as before. The strokes were very slow and methodical. Each circuit of the barrel took about 5 minutes. Lap contact was very good with very loud screeching noises being heard. Once again, the noises only occurred when the lap was over the middle zones of the mirror, never at the center or edge. Figures 106 and 107 show the mirror at the end of the session.
A set of Foucault images were taken and data extracted. Figure 108 shows the results of the analysis as presented by the program FigureXP. The average best fit conic constant has been reduced to -0.991, the P-V wavefront error is now 1/4.5, and the Strehl ratio is 0.893. The fall-off at the extreme edge has been reduced a little. I think this improvement is real since I was also able to barely glimpse the diffraction ring at the edge while capturing the Foucault images.

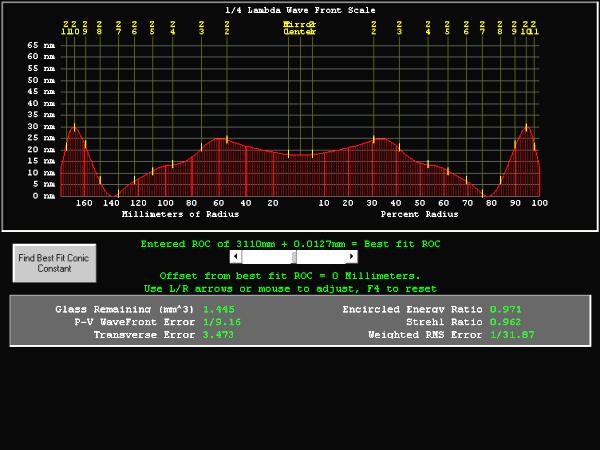
Another figuring session was done with the 7" lap. The lap was pressed for an hour and a half prior to the session. Only one trip around the barrel was done taking about 5 minutes. Long, wide W strokes were used with 3" of overhang in both front to back and side to side motions. Figures 109 and 110 at left show the mirror and the subsequent Foucault analysis. I reran the test two more times on different diameters to check the results. The general surface profiles matched each time. (Figure 110 shows the results that were in the middle of the range of tests.) The Strehl ratios ranged between 0.950 and 0.990. The average best fit conic constant is about -1.003. If these test results hold up to additional types of testing, the mirror is complete. It will now be tested using other test methods for verification. I will rig up a jig to star test and ask my friend T. Lum to try to run a Gaviola Caustic test on the mirror for independent verification.

Figure 111 at left shows the final Foucault image of the mirror taken at the 68% zone. The figure is smooth and free of obvious zones. There is no diffraction ring at the left edge owing to the very steep, narrow turned edge still present. The outermost 1/32" of edge is focusing about 3mm beyond where it should. Just inside the turned edge is a rolled area that is a little wider than 1/8". The rolled area appears to fall off about 15 to 20 nanometers from the high zone at the 95% radius zone. I will decide how much of the edge to paint over after star testing the mirror but expect that no more than 1/8" will be required. The mirror grinding phase took 14 hours to complete (for both front and back including a flash polish on the back). Initial polishing with pads took a little more than 4 hours. Pitch lap polishing and figuring took over 38 hours. Those times do not count pressing, cleanup, or testing time. They are actual grinding and figuring time. I would estimate that total work time was nearly three times that amount or about 150 hours. In addition to the mirror work time, I also probably spent about 30 hours making the grinding tool and making, channelling, and re-channelling the four polishing and figuring laps. Overall, I have invested about 180 hours in this mirror.
Figure112 shows the width of the turned edge better. I estimate that it is slightly wider than 1/32" at the very edge. The diffraction effects of the Ronchi test are less obvious in this view inside of the center of curvature of the mirror allowing me to see the very thin sliver of light from the edge wrapping the partial circumference of the mirror edge nearby. Note the end of the dark band in the boxed area which shows where the bright edge of the adjoining bright band encroaches along the mirror's physical edge. The Foucault readings show that there is a very narrow rolled edge also present. The two combined are less than 1/8" in total width.
Final Assessment
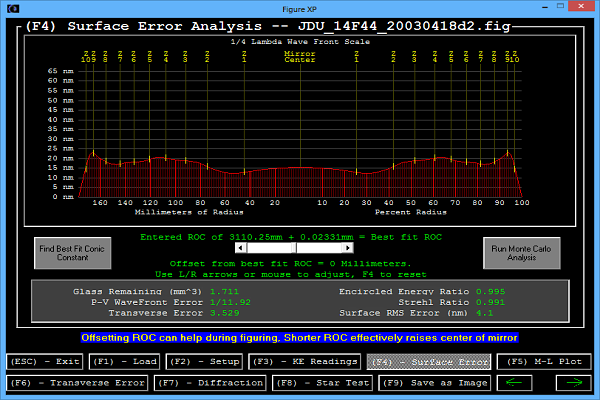

I have decided to call the mirror done. The star test was done with a temporary "Rube Goldberg" set-up. The mirror performs quite well even at higher powers.
Figure 113 shows an averaged Foucault analysis of the mirror. Foucault tests were performed on three different diameters and the resulting profiles then averaged. (This method will average and hide any astigmatism present in the mirror. Any such astigmatism in this particular mirror appears to be minor enough to not show up in the star test.) Figure 114 shows a montage of the Foucault zonal images for the finished mirror.
I hope that this detailed work log will be of use to others. It shows what is probably a fairly typical twisted path that often must be followed to finish a mirror. If nothing else, it will surely help me in the future on other mirrors since it documents the techniques that worked for me along with those that failed. One always learns from their mistakes and this mirror provided many learning experiences for me which may prove useful on future mirrors.